


PreSonus 的工作站软件 Studio One 升级到了 5.5 版本
包括了多项新功能!

包括了多项新功能!
Studio One 5.5 adds many new improvements for production, performance, and especially mastering.
The first and still only DAW with an integrated mastering environment, Studio One 5.5’s Project Page is now even more powerful.
With more than two dozen new features, improvements, and workflow enhancements,
Studio One 5.5 will supercharge your productions whether your creating, mastering, or performing them live.
Studio One 5.5 为制作、性能,尤其是母带处理增加了许多新的改进。
Studio One 5.5 的项目页面是第一个也是唯一一个具有集成母带处理环境的 DAW,现在更加强大。
Studio One 5.5 拥有超过两打的新功能、改进和工作流程增强功能,
无论您是创作、母带处理还是现场表演,都将为您的作品增色不少。
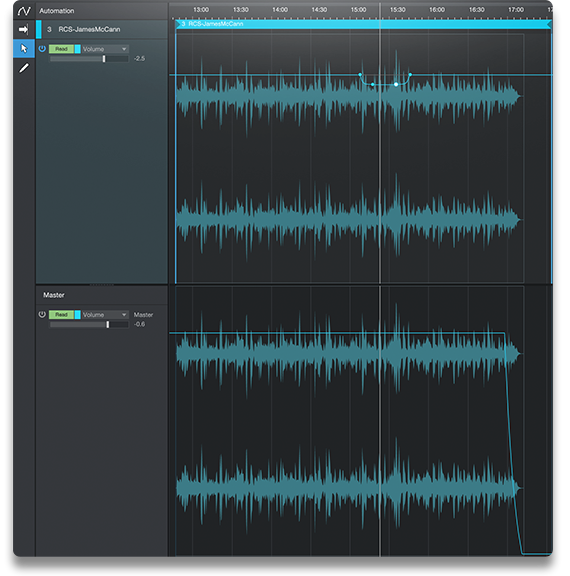
Track Automation on Project Page
Studio One 5.5 introduces the #1 feature request for the Project Page: Automation is here!
This new feature lets you automate track and master volume, as well as any Plug-in parameter,
either in real-time using your mouse or hardware controller, or by using the familiar tools, including the powerful Paint Tool with its eight different modes.
Apply volume automation to your liking; implement some gentle compression over time to bring some lift to your choruses;
or dynamically tweak your tracks’ stereo width for a consistent stereo imaging across your entire album.
在项目页面上跟踪自动化
Studio One 5.5 引入了项目页面的#1 功能请求:自动化就在这里!
这个新功能让您可以使用鼠标或硬件控制器实时自动执行轨道和主音量以及任何插件参数,
或者使用熟悉的工具,包括具有八种不同模式的强大绘画工具。
根据您的喜好应用音量自动化;随着时间的推移实施一些温和的压缩,为您的合唱带来一些提升;
或动态调整曲目的立体声宽度,以在整个专辑中实现一致的立体声成像。
Once created, automation data can be modified in different ways,
including via the useful bracket tool, transform tool, or by editing the shape of automation lines and curves directly with the Arrow tool.
Adding an automation lane for a specific plug-in parameter is a two-click operation.
Automation is available for individual track and master volume,
as well as any track insert effects plug-in or plug-ins on the Master bus.
创建后,自动化数据可以通过不同的方式进行修改,
包括通过有用的括号工具、变换工具,或直接使用箭头工具编辑自动化线和曲线的形状。
为特定插件参数添加自动化通道是两次单击操作。
自动化可用于单个轨道和主音量,
以及主总线上的任何轨道插入效果插件或插件。
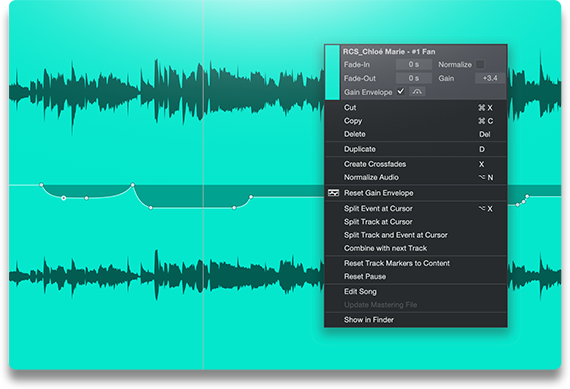
Clip Gain Envelopes on Project Page
Clip Gain Envelopes are now available on the Project page so you can precisely fix gain issues
while mastering without using dynamics plug-ins.
项目页面上的剪辑增益包络
剪辑增益包络现在可在项目页面上使用,
因此您可以在母带处理时精确修复增益问题,而无需使用动态插件。
Clip Gain Envelopes are the perfect tool for correcting sections of audio
that are either too loud or too soft without adding a Compressor or Limiter plug- in.
Add breakpoints to the Gain Envelope simply by clicking on the curve and dragging the point to your desired location.
Changes to the clip gain are instantly reflected in the audio waveform so you have a reliable visual display of the overall level.
Clip Gain Envelopes are sample-accurate, so they can be used to fix everything from entire voiceover takes to single clicks and pops.
Clip Gain Envelopes 是一种完美的工具,
可以在不添加 Compressor 或 Limiter 插件的情况下校正过响或过软的音频部分。
只需单击曲线并将断点拖动到所需位置,即可将断点添加到 Gain Envelope .
剪辑增益的变化会立即反映在音频波形中,因此您可以可靠地直观显示整体电平。
剪辑增益包络是样本精确的,因此它们可用于修复从整个画外音到单击和爆破的所有内容。
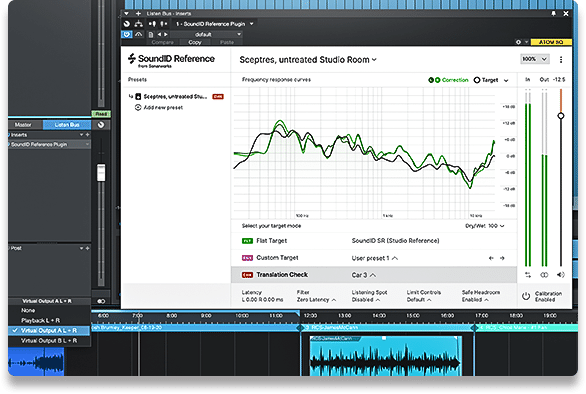
Listen Bus on Project Page
The Listen Bus is now available on the Project Page,
allowing you to monitor through a separate output with separate effects while keeping the Master output unaffected.
This way, you can use popular room correction plug-ins such as Sonarworks Reference
or headphone monitoring tools such as Waves Abbey Road Studio while mastering or mixing.
在项目页面上收听总线
监听总线现在在项目页面上可用,
允许您通过具有单独效果的单独输出进行监听,同时保持主输出不受影响。
这样,您可以在母带或混音时使用流行的房间校正插件
(例如 Sonarworks Reference)或耳机监听工具(例如 Waves Abbey Road Studio)。
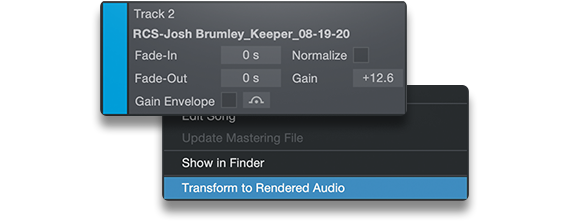
Track Transform on Project Page
Track Transform is now available on the Project Page as well as the Song Page.
Track Transform lets you create rendered files of your mastered track,
with every insert effect and automation parameter printed into the file — reversibly and non-destructively.
This lets you reduce the computer processing power required of your session without committing to a mastering decision permanently.
在项目页面上跟踪转换
轨道变换现在可在项目页面和歌曲页面上使用。
Track Transform 可让您创建母带轨道的渲染文件,
并将每个插入效果和自动化参数打印到文件中 - 可逆且非破坏性。
这使您可以减少会话所需的计算机处理能力,而无需永久做出掌握决定。
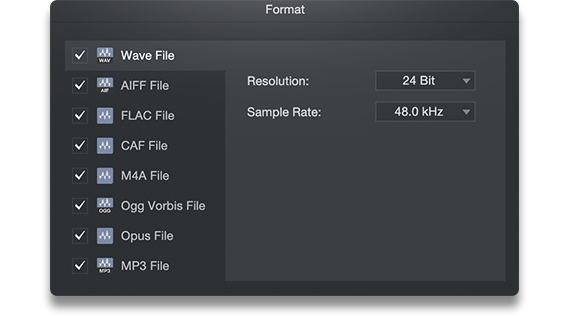
Multiple format export for Digital Release
The Digital Release window on the Project Page now features a list of available audio formats
which can be exported in a single pass — with no additional rendering time!
Each format remembers its own export settings,
so you can export your mastered album in high- resolution, 24-bit/96kHz WAV and AAC
for streaming at the same time!
多种数字格式导出
项目页面上的数字发布窗口现在提供可用音频格式列表,
可以一次性导出 - 无需额外的渲染时间!
每种格式都会记住其自己的导出设置,
因此您可以将您的母带专辑导出为高分辨率、24 位/96kHz WAV 和 AAC,
以便同时进行流式传输!
Target Loudness on Digital Release
The new Loudness options in the Digital Release window of the Project Page let you set target values for loudness and true peak during export.
Not sure what values to set? No problem. Simply select from a list of common target loudness presets and let Studio One set the values for you.
Presets for every major streaming service are included
— from Apple Music to Spotify to YouTube — so there’s no Googling and no guesswork.
And of course, you can create your own custom Loudness setting for later use.
数字发布的目标响度
项目页面的数字发布窗口中的新响度选项可让您在导出期间设置响度和真实峰值的目标值。
不知道是什么值来设置?没问题。只需从常用目标响度预设列表中选择,让 Studio One 为您设置值。
包括每个主要流媒体服务的预设——从 Apple Music 到 Spotify 再到 YouTube
——所以没有谷歌搜索和猜测。
当然,您可以创建自己的自定义响度设置以供以后使用。
Once you’ve set your values or selected a preset, each track on your album is analyzed during export,
and loudness and true peak are brought down to match the standards of the chosen service accordingly.
Your tracks will have consistent loudness with the best-sounding songs on your platforms of choice
— and listeners won’t be reaching for the volume knob.
设置好值或选择预设后,专辑中的每首曲目都会在导出期间进行分析,
并相应地降低响度和真实峰值以匹配所选服务的标准。
您的曲目将与您选择的平台上的最佳声音歌曲保持一致的响度
- 让听众不用伸手去调音量旋钮。
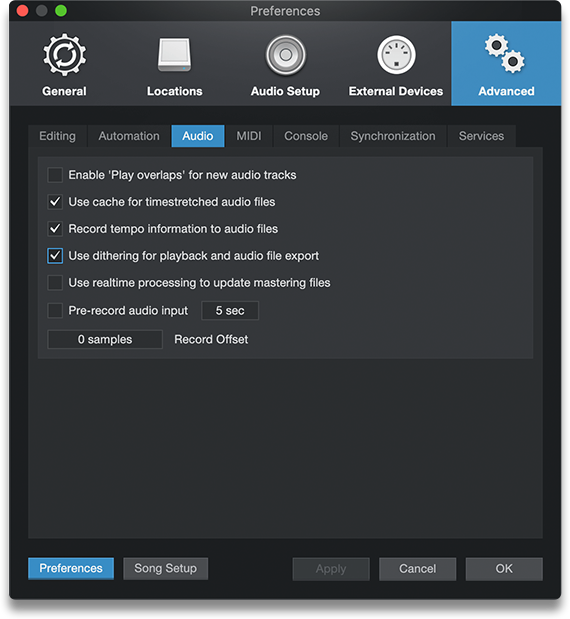
New high-end dithering algorithm
Studio One 5.5 features a new, proprietary, custom-designed dithering algorithm
that minimizes conversion artifacts and preserves low-level signals.
It sounds so good that we’ve replaced Studio One’s previous dithering algorithm with it,
so if you’ve got Dithering turned on (in the Advanced Preferences/Audio menu) you’re already using it!
新的高端抖动算法
Studio One 5.5 采用了一种新的、专有的、定制设计的抖动算法,
可以最大限度地减少转换伪影并保留低电平信号。
听起来太好了,我们已经用它替换了 Studio One 以前的抖动算法,
所以如果你打开了抖动(在高级首选项/音频菜单中),你已经在使用它了!
Dithering exists to prevent the harsh-sounding truncation distortion that otherwise occurs when converting digital audio
from a high-resolution format (such as a 32-bit float .WAV file) to a lower-resolution format (like a 16-bit .MP3).
It’s common practice to conduct mixing and mastering work in a high-resolution format,
which of course sounds the best—and later downsample for distribution
to meet the format requirements of online distribution and streaming platforms or CD.
存在抖动是为了防止在将数字音频从高分辨率格式(例如 32 位浮点 .WAV 文件)
转换为较低分辨率格式(例如 16 位 .MP3)时出现的刺耳截断失真.
以高分辨率格式进行混音和母带处理是一种常见的做法,
这当然听起来是最好的——然后再进行下采样以进行分发,
以满足在线分发和流媒体平台或 CD 的格式要求。
Our new dithering algorithm ensures that these conversions will minimize the audible noise, artifacts, and distortion that can be caused by lesser algorithms.
And it’s a Studio One exclusive.
我们新的抖动算法确保这些转换将最小化可能由较少算法引起的可听噪声、伪影和失真。
它是 Studio One 的独家产品。
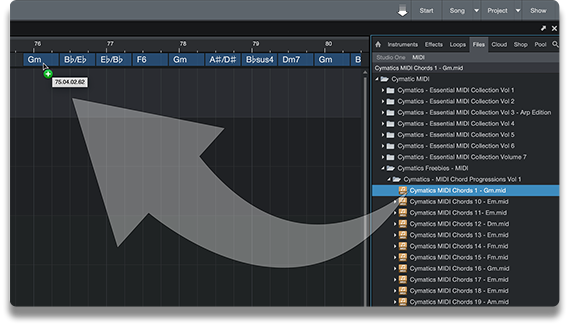
Drag and Drop MIDI files to Chord Track to extract chords
Any MIDI file can now be dragged directly to the Chord Track to extract its chords.
This works with any .MID file, including MIDI chord packs or any songs in Standard MIDI file format.
What’s more, only Studio One’s chord detection works with Audio Events as well as with Instrument Events.
It has never been easier to prototype a Song so quickly and simply— and keep your creative spark alive.
将 MIDI 文件拖放到 Chord Track 以提取和弦
现在可以将任何 MIDI 文件直接拖到和弦轨道以提取其和弦。
这适用于任何 .MID 文件,包括 MIDI 和弦包或任何标准 MIDI 文件格式的歌曲。
更重要的是,只有 Studio One 的和弦检测适用于音频事件以及乐器事件。
如此快速和简单地制作歌曲原型从未如此简单——并保持您的创意火花。
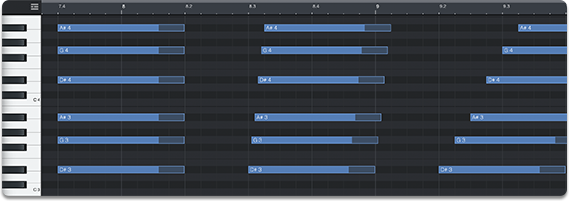
Create a strum pattern by dragging notes
You can now create a strum pattern manually by dragging note events in a selected chord while holding the [Cmd+Opt] / [Ctrl+Alt] modifier keys.
The notes will be locked to their vertical position (Pitch) and their horizontal position will be spread between the drag start and the dragged note position,
allowing you to create strummed chords with a single movement.
通过拖动音符创建弹奏模式
您现在可以通过在按住 [Cmd+Opt] / [Ctrl+Alt] 修饰键的同时拖动所选和弦中的音符事件来手动创建弹奏模式。
音符将被锁定到它们的垂直位置(音高),它们的水平位置将分布在拖动开始和拖动音符位置之间,
允许您通过单个动作创建弹奏和弦。
Ampire now optimized for fast preset switching on Show Page
Ampire now features improved preset switching for live performance.
Switching Ampire presets is now faster than ever and optimized for use with the Show Page,
so you can trigger your favorite Ampire presets from a MIDI pedalboard during a show without missing a beat!
Ampire 现在针对显示页面上的快速预设切换进行了优化
Ampire 现在具有改进的现场表演预设切换功能。
切换 Ampire 预设比以往任何时候都更快,并针对 Show Page 进行了优化,
因此您可以在演出期间从 MIDI 踏板触发您最喜爱的 Ampire 预设,而不会错过任何一个节拍!
Other notable features and improvements
Workflow and Performance
Automation included in Mix Scenes
Plug-in Nap option per plug-in
Remote control Impact XT / Sample One XT sample editors with ATOM SQ and ATOM
Copy/Paste pads in Impact XT
Chord Selector: new 2, b5 and #5 intervals (tensions)
Draw vertical stacks of notes
Manual time stretching by adjusting Event start
Option to Snap Event End to grid
Limit of simultaneously added tracks increased to 500
Project Page
Tab to rename Tracks
Option to replace audio on Track
Default track pause is now set to 0 for new Projects
Show Page
Detached Performance View for dual monitor use
General
Improved handling of plug-in processing errors
Support for Opus audio file format
Plug-in list in Diagnostics Report
Display plug-in name and slot on Automation Tracks
Support for Steinberg CC121 and Tascam Model 12
New Commands
Project Page - Transform to Rendered Audio
Project Page - Transform to Real Time Audio
Score - Toggle Note or Rest
其他值得注意的功能和改进
工作流程和性能
混合场景中包含的自动化
每个插件的插件小睡选项
远程控制 Impact XT / Sample One 带有 ATOM SQ 和 ATOM 的 XT 样本编辑器
Impact XT 中的复制/粘贴焊盘
和弦选择器:新的 2、b5 和 #5 音程(张力)
绘制垂直堆叠的笔记
通过调整事件开始手动时间拉伸
将事件结束对齐到网格的选项
同时添加曲目的限制增加到 500
项目页面
重命名曲目的选项卡
替换轨道上的音频的选项
新项目的默认轨道暂停现在设置为 0
显示页面
用于双显示器的分离性能视图
一般的
改进了插件处理错误的处理
支持 Opus 音频文件格式
诊断报告中的插件列表
在自动化轨道上显示插件名称和插槽
支持 Steinberg CC121 和 Tascam Model 12
新命令
项目页面 - 转换为渲染音频
项目页面 - 转换为实时音频
乐谱 - 切换音符或休止符
更多更新内容,详见官网:https://www.presonus.com/products/Studio-One/new-in-studio-one#ytl-fcoxHw_N2ag
