


在这里,将详细教您使用 Claro

While writing music in a DAW with plug-in synths, loops, and drum machines,
source sounds all tend to take up lots of space across the spectrum.
This can quickly lead to a very busy sounding mix.
At this stage, a little bit of tone shaping goes a long way
- if we can make what we're hearing a little closer to how a final mix could sound,
we'll be able to make our musical choices with that final sound in mind.
If quick volume and EQ adjustments don't work to meld a new part with the existing instrumentation,
perhaps the music would benefit from a different sound source or alternate melodic or chordal arrangement.
Yet this is easy to lose sight of when we're able to dive down a rabbit hole of detailed EQ tweaking at any moment.
We can find ourselves putting more time into tweaking a sound which struggles to fit than exploring
the wider range of possibilities available by tweaking the instrumentation and the music itself.
A helpful approach is to use tools with fewer options while composing and different tools with more flexible options while mixing.
However, if we can't see our early EQ moves that weren't quite right or are now causing a problem in the final mix,
because they're in a different plugin than the one we're using to finesse,
the experience is more difficult to learn from. Building intuition takes longer.
With that in mind, Claro allows its flexibility to unfold over time.
We don't need to ignore it in the early stages,
or switch back and forth between tools in the later stages.
If we start with Claro, we can use it all the way through to the end.
在带有插件合成器、循环和鼓机的 DAW 中编写音乐时,
源声音都倾向于在整个频谱中占据大量空间。
这会为您的混音增加许多的工作量。
在这个阶段,些许的声音塑形都会对音色带来很大的变化。
- 如果我们能使我们听到的东西更接近于最终混音的声音,
我们就能在考虑到最终声音的情况下做出如何调整的选择。
如果快速音量和 EQ 调整无法将新部分与现有乐器融合在一起,
那么尝试不同的声源或交织的旋律或和弦安排将会让音乐更加动听。
目前在调整 EQ 的过程中,很容易因为各种错综复杂的细节而丢失目标。
我们会发现自己把更多的时间花在了调整一个难以融合的声音上,
而不是通过调整乐器和音乐本身来探索更广泛的可能性。
一个有用的方法是在作曲时使用选项较少的工具,而在混音时更灵活的选择使用不同的工具。
然而,如果我们未能发现我们前期 EQ 调整的隐患,其势必会在最终的混音中造成问题,
因为我们会用到许多的插件,并不只是在一个插件内进行调整。
靠经验就更难了,建立直觉需要更长的时间。
考虑到这一点,Claro 允许其灵活性随着时间的推移而展开。
我们不要在前期阶段忽略它,
否则在后期阶段我们就得在各种工具之间来回切换。
我们可以从开始到最后,都一直使用 Claro。
Produce
Produce 视窗
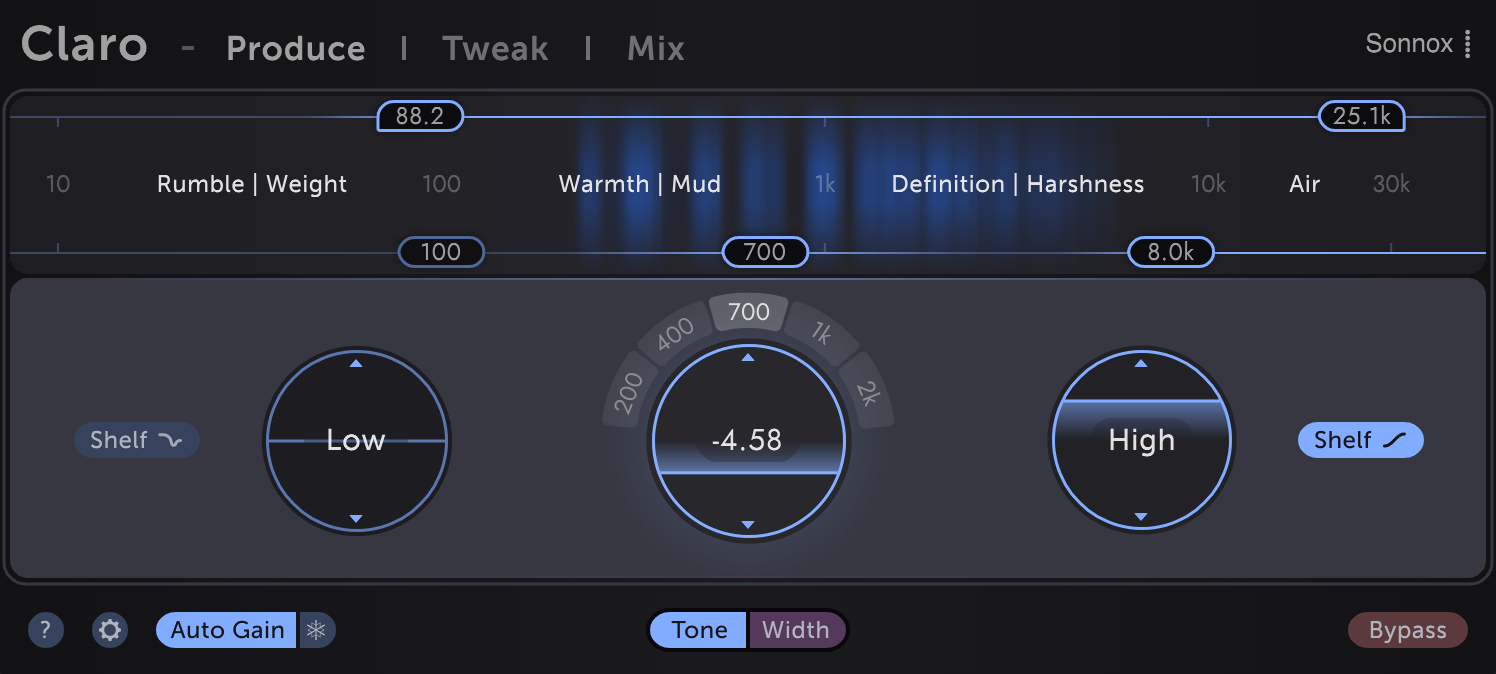
Gut feeling is the key here.
We can see immediately where in the spectrum the sound's energy is vs where we would like it to be - not just in terms of Hz,
but in the language we usually use to describe sounds.
Just drag a horizontal slider towards Definition, if that's what we want more or less of,
then drag the circular gain control up and down to taste.
The same goes for the low and high cut filters above the energy meter.
Just drag the left-hand Low Cut slider to the right to remove low end rumble or reduce weight and mud.
直觉是这里的关键。
我们可以立即看到声音能量在频谱中的位置与我们希望的位置 - 不仅仅是在赫兹方面,
而且在我们通常用来描述声音的语言中。
只需将水平滑块拖向定义,如果这是我们或多或少想要的,
然后向上和向下拖动圆形增益控件以进行品尝。
能量计上方的低切滤波器和高切滤波器也是如此。
只需将左侧的 Low Cut 滑块向右拖动即可消除低端隆隆声或减轻重量和泥浆。
Frequency shortcuts
频率快捷调制
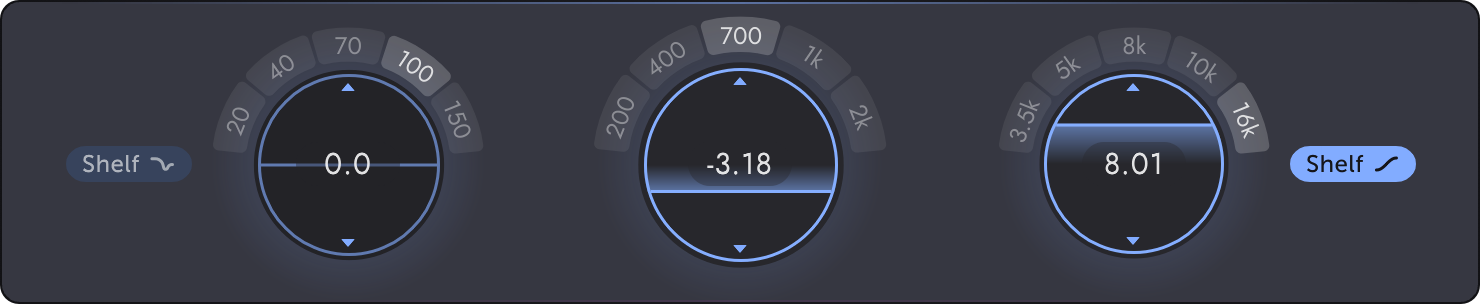
The set options for each band are inspired by various popular analogue EQs.
They've been chosen because they're frequently useful and are often a great starting point - close enough while composing
and mixing quickly and fully adjustable later on in Tweak and Mix views.
For anyone with an existing intuition for the sound of EQ moves in specific frequency ranges,
these hover shortcuts can be even faster than the sliders.
And using them is a great way to build that intuition!
每个频段的设置选项的灵感来自各种流行的模拟均衡器。
之所以选择它们,是因为它们通常很有用,并且通常是一个很好的起点 - 足够接近,
同时快速合成和混合,并且稍后在 Tweak 和 Mix 视窗中完全可调整。
对于任何对特定频率范围内 EQ 移动的声音有直觉的人来说,
这些悬停快捷方式甚至可以比滑块更快。
使用它们是建立这种直觉的好方法!
Shelving modesEnable the Low bandfor rumbly low end enhancement
without the mud of a typical shelving EQ (a lot like the classic Pultec push/pull trick!).
In Tweak/Mix views this behaviour is available for all bands by switching them into Shelf Shape and increasing the Overshoot control (more about this later)
Enable the High bandfor smooth airy boosts or subtle high end softening.
The Slope is gentler than a typical shelving EQ, so can be pushed/pulled harder without harshness or dullness.
搁架模式
启用低频段
 以进行隆隆声的低端增强,
而没有典型搁架均衡器的泥泞感(很像经典的 Pultec 推/拉技巧!)。
在 Tweak/Mix 视窗中,通过将它们切换到 Shelf Shape 并增加 Overshoot 控制(稍后会详细介绍),此行为可用于所有频段
启用高频段
 以获得平滑的通风增强或微妙的高端柔化。
斜率比典型的搁架均衡器更温和,因此可以更用力地推/拉而不会刺耳或沉闷。
而没有典型搁架均衡器的泥泞感(很像经典的 Pultec 推/拉技巧!)。
在 Tweak/Mix 视窗中,通过将它们切换到 Shelf Shape 并增加 Overshoot 控制(稍后会详细介绍),此行为可用于所有频段
启用高频段
斜率比典型的搁架均衡器更温和,因此可以更用力地推/拉而不会刺耳或沉闷。
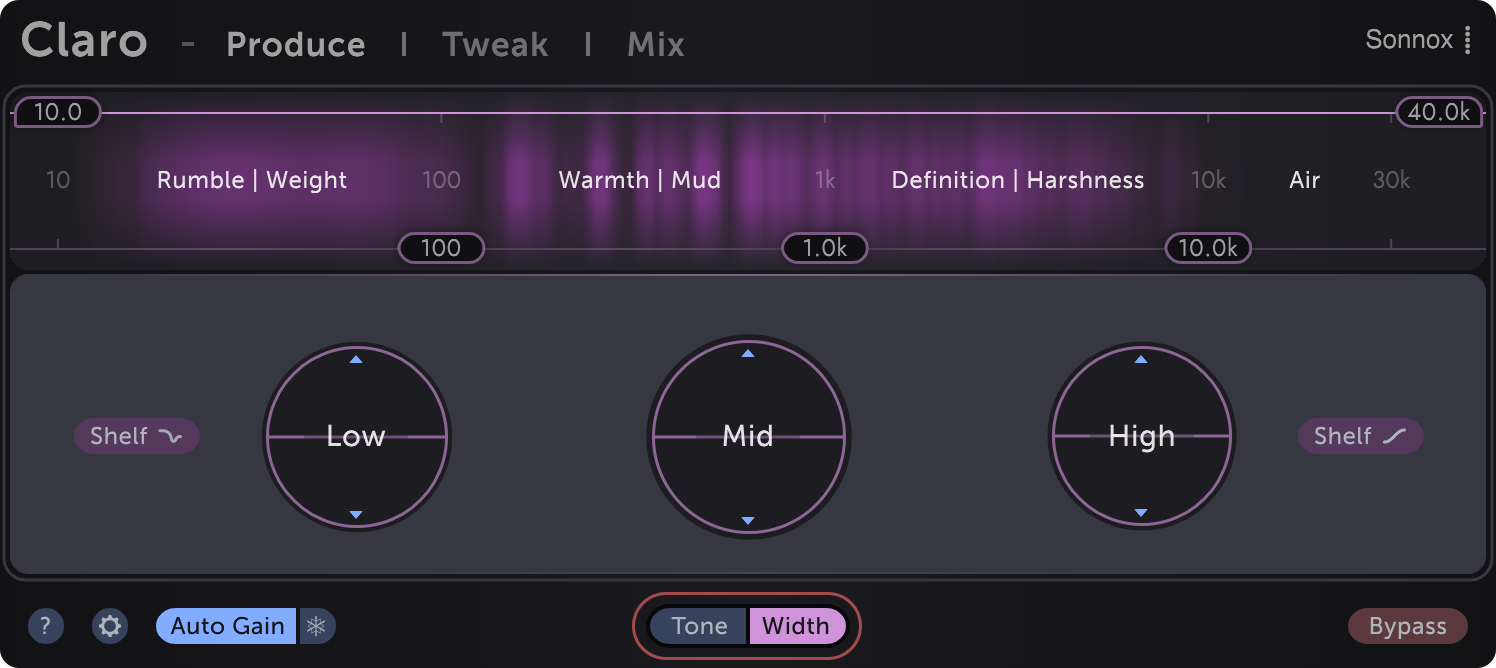
Tone and WidthOn stereo tracks a Tone | Width button appears in the plugin footer.
Toggle it to switch Produce view between overall stereo Tone shaping and stereo Width shaping.
音调和带宽
在立体声轨道上有一个 Tone | Width 按钮出现在插件下方页脚中。
切换它以在整体立体声音调整形和立体声宽度整形之间切换并生成视图。
切换它以在整体立体声音调整形和立体声宽度整形之间切换并生成视图。
Bright Width metering shows regions of the spectrum with wide stereo image, while dark areas show where the signal is narrow (or mono).
Bands that boost or cut in regions with little or no Width will sound like they're bypassed.
Width bands apply EQ to only the "side" channel - attenuate a band to narrow the stereo image in that area of the spectrum, or boost to widen it.
Do be careful when boosting - a little goes a long way! See the Stereo tone shaping section for more information about "mid / side" EQ and how to get the most from it.
亮宽测光显示具有宽立体声图像的频谱区域,而暗区显示信号较窄(或单声道)的位置。
在宽度很小或没有宽度的区域中增强或削减的频段听起来像是被旁通了。
宽频带仅将 EQ 应用于“侧”通道 -衰减频带以缩小该频谱区域中的立体声图像,或增强以加宽它。
提升时要小心 - 调整一点点就大有帮助!有关“中/侧”均衡器以及如何充分利用它的更多信息,请参阅立体声音调整形部分。
Mono-ing the low endHere the Width meter shows a sound with wide stereo image across the spectrum:
单声道低频端
此处,宽度表显示了在整个频谱范围内具有宽立体声图像的声音:

The low end Width energy around Rumble | Weight can be removed simply by dragging the Low Cut filter to the right.
This is often a good thing to do on stereo instruments whose low end energy isn't fundamental to the bottom-end groove or ambience of the mix.
在隆隆声周围的低端宽度能量可以通过向右拖动低切滤波器来移除。
这对立体声乐器来说通常是件好事,
因为这些乐器的低端能量对混音的低频律动或氛围并不重要。
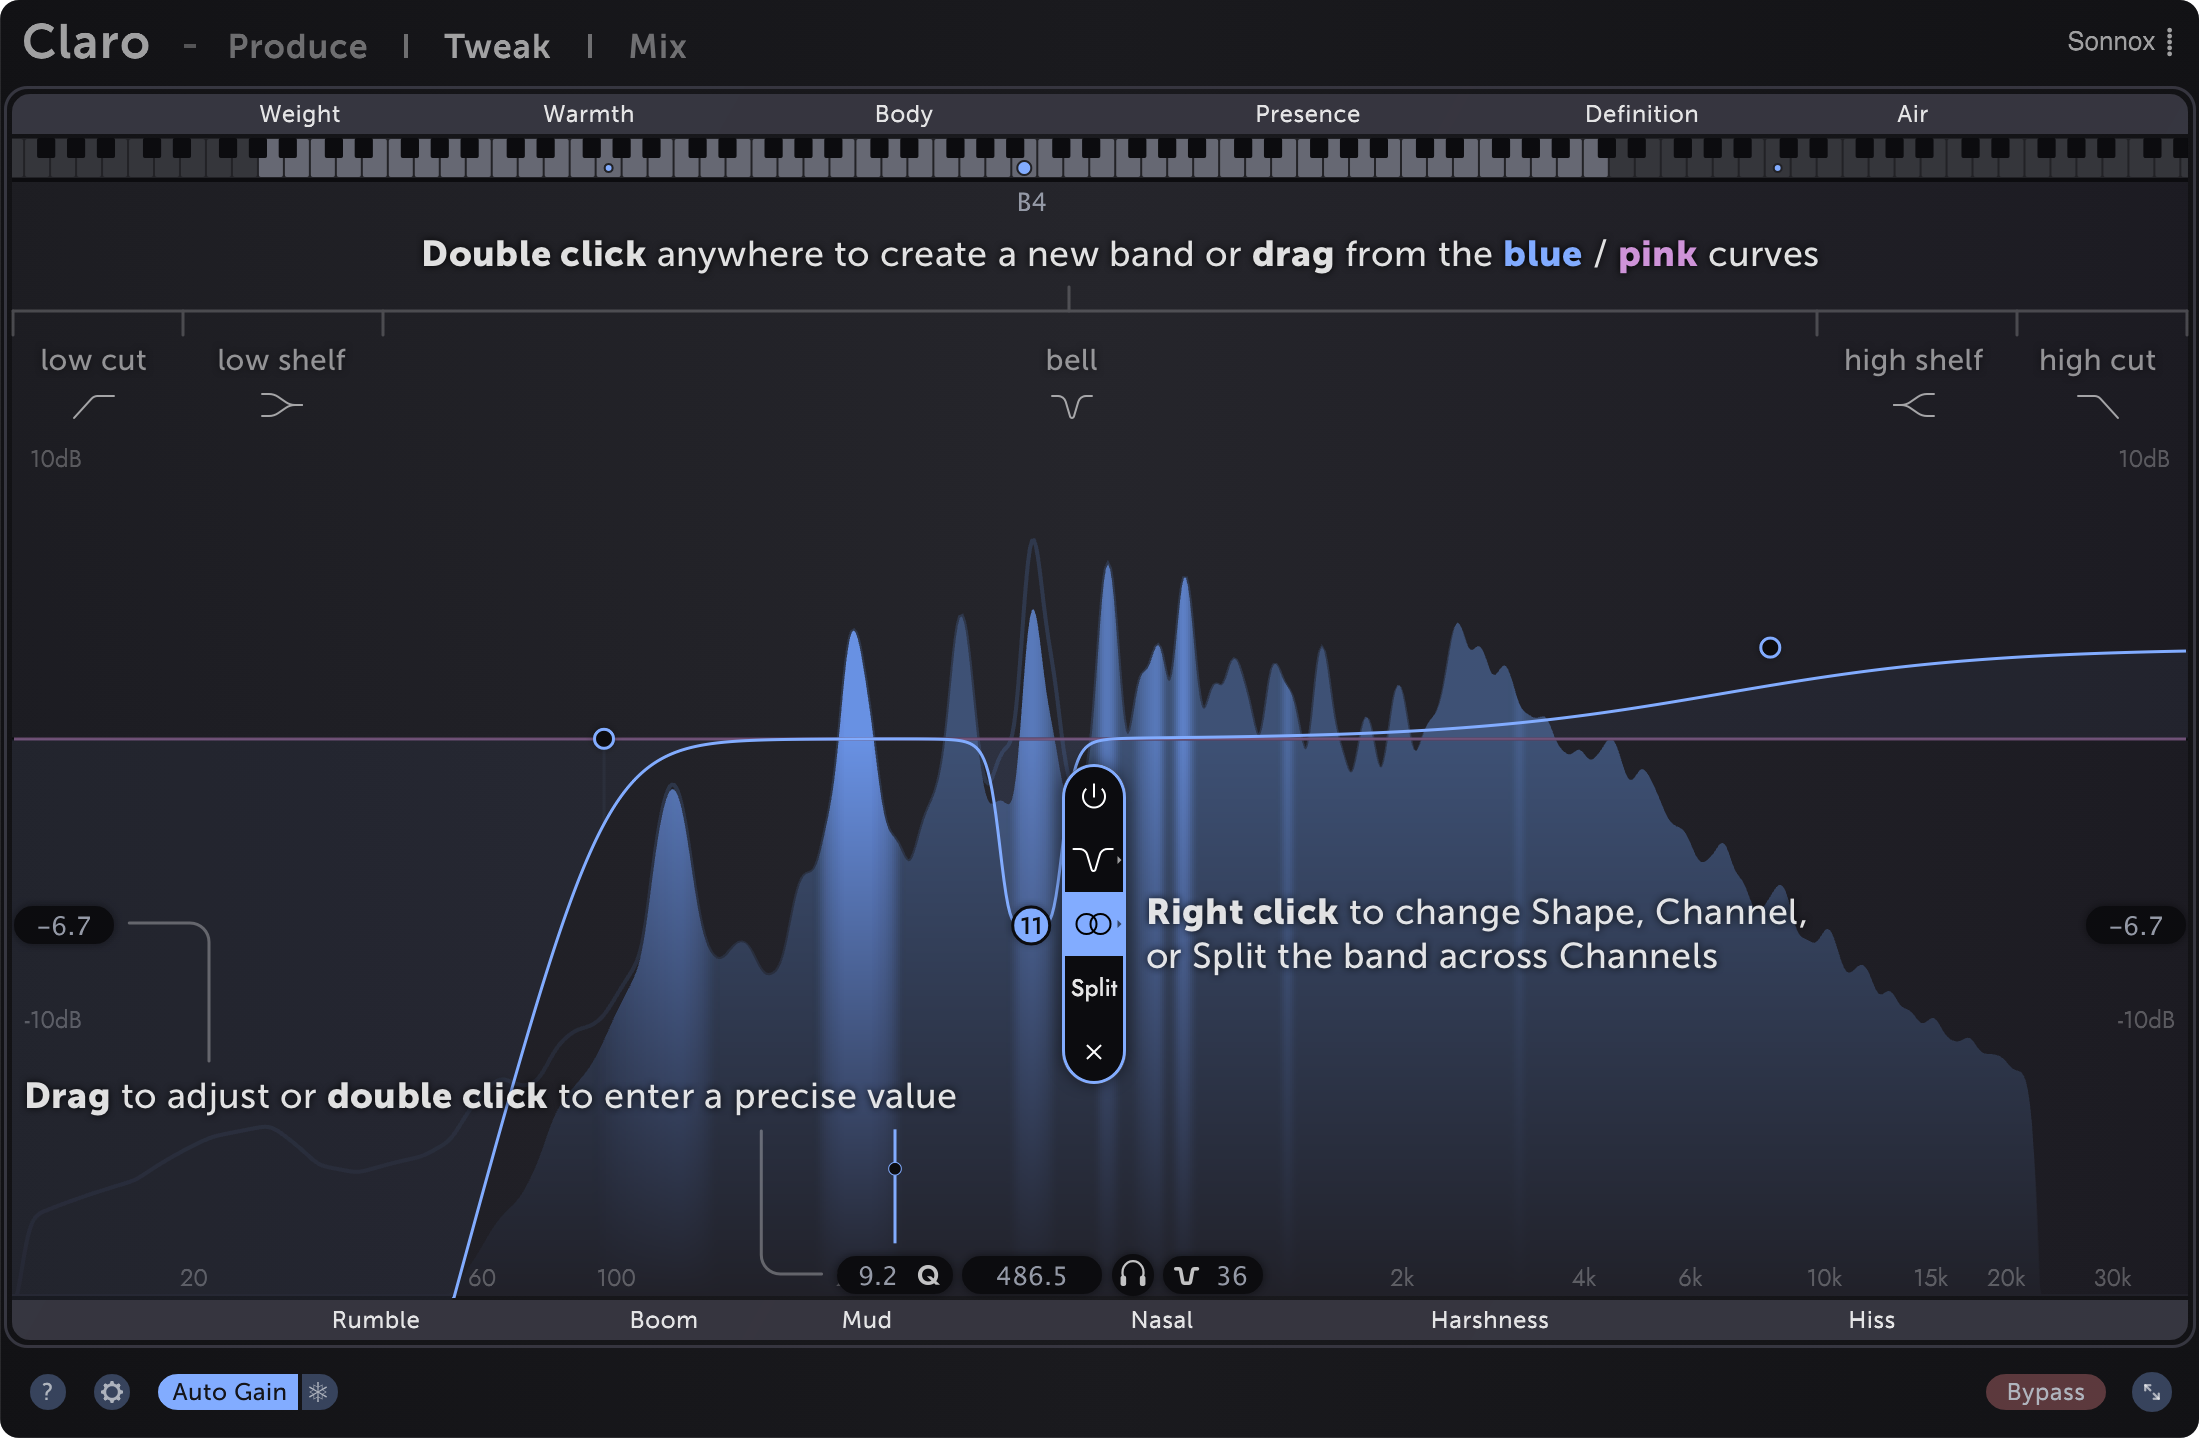
TweakWhen you need to get really surgical, dive into Tweak view!
All of your tone shaping moves from Produce view are carried over and can be further adjusted,
and up to 16 additional bands can be added.
Tweak 视窗
当您需要真正开始动手的时候,请进入 Tweak 视窗!
您从 Produce 视窗中进行的所有音色塑造动作都会被保留下来并可以进一步调整,
并且最多可以添加 16 个额外的频段。
您从 Produce 视窗中进行的所有音色塑造动作都会被保留下来并可以进一步调整,
并且最多可以添加 16 个额外的频段。
EQ controls
均衡器控制
When multiple bands are selected, Gain, Frequency, Q, and Slope are adjusted relatively while Shape and Channel are adjusted absolutely.
选择多个频段时,Gain、Frequency、Q、Slope 相对调整,Shape 和 Channel 绝对调整。
Band Right Click menu
频段右键菜单
Bypass bandsDouble Click a band's handle to toggle Bypass or click
旁路带Double Click乐队的手柄来切换旁通或单击

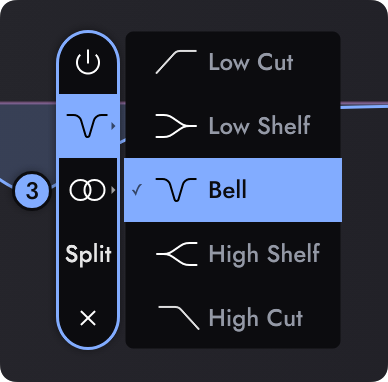
Shape
Low Cut: Removes all sound below the band's Frequency
Low Shelf: Boost or attenuate low frequency sound
Bell: Boost or attenuate either side of the band's Frequency
High Shelf: Boost or attenuate high frequency sound
High Cut: Remove all sound above the band's Frequency
形状
低切:删除低于频段频率以下的所有声音
低架:增强或减弱低频声音
钟形:提升或衰减频段的任一侧频率
高架:增强或减弱高频声音
高切:删除高于频段频率以上的所有声音
Channel (stereo tracks only)
Applies the band's processing only to the selected channel. See Stereo tone shaping for details.
通道(仅限立体声轨道)
仅将频段处理应用于所选通道。有关详细信息,请参阅立体声音调整形。
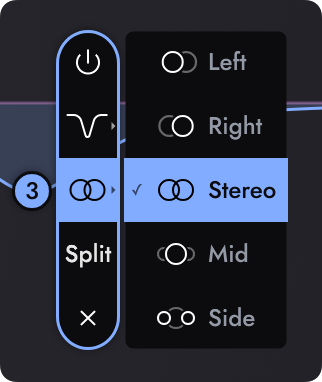
Split (stereo tracks only)
Splits the band across two channels.
A Stereo/Left/Right band splits into → Left & RightA Mid/Side band splits into → Mid & Side
拆分(仅限立体声曲目)
将频段拆分为两个通道。
立体声/左/右乐队分裂为 → 左和右中/侧频带拆分为 → Mid & Side
Delete a band
Click thebutton.
删除频带
单击

Floating controls
浮动控件

Gain (dB)
Gain (dB) controls float on the left and right sides of the EQ display, in line with the selected band
Drag vertically to adjust the band's Gain without adjusting Frequency, or Double Click to enter a precise value.
增益 (dB)

增益 (dB) 控件浮动在均衡器显示的左侧和右侧,与所选频段一致
垂直拖拽调整频段的增益而不调整频率,或双击输入精确值。
Frequency (Hz, Note) Q control
Frequency (Hz, Note) controls float below and above the selected band
Drag left/right to adjust the band's Frequency without adjusting Gain, or Double Click to enter a precise value in Hz or as a Note value.
频率 (Hz, Note) Q 控制


向左/向右拖拽调整频段的频率而不调整增益,或双击以 Hz 为单位输入精确值或作为音符值。
Q control
Adjusts how wide a Bell band is across the frequency range, and how much resonant boost a Low or High Cut filter band has at its cutoff freque
Scroll, Command Drag (macOS), or Control Drag (Windows) and Bell band's handle to adjust its Q.
Drag a Low/High Cut band's handle vertically to adjust its Q.
Q控制

调整钟形频带在整个频率范围内的宽度,以及低切或高切滤波器频带在其截止频率处的共振提升量
滚动, Command 拖拽(macOS), 或 Control 拖拽(Windows) 和钟形频带的拉手来调整它的 Q 值。
垂直拖拽一个低/高切频段的拉手调整其Q。
Slope control
Adjusts how steep the edges of a band's curve are. Use a Slope ot 6 (dB/octave) for smooth and subtle shaping, 12 to match the sound of a typical EQ, and higher Slopes up to 120for extremely precise spectral tweaking.
Scroll, Command Drag (macOS), or Control Drag (Windows) and Low/High Cut band's handle to adjust its Slope.
斜率控制


调整一个频段的曲线边缘的陡峭程度。使用斜率6(dB/倍频程)进行平滑和微妙的塑造,使用12来匹配典型的均衡器的声音,使用更高的斜率到120进行极其精确的频谱调整。
滚动、Command 拖拽(macOS) 或 Control 拖拽(Windows) 和低/高切频段的拉手来调整其斜率。
Shelf Overshoot
Overshoot replaces the Q control for Shelf bands.
Increasing the Overshoot creates a dip on the other side of the shelf boost (or vice versa).
A setting of 0% has no overshoot, and behaves like a typical EQ shelf.
Settings around 50% mimic the behaviour of some analogue EQs renowned for their "musical" qualities.
Scroll, Command Drag (macOS), or Control Drag (Windows) a Shelf band's handle to adjust its Q.
搁架过冲

Overshoot 取代了 Shelf 频段的 Q 控制。
增加 Overshoot 会在架子提升的另一侧产生一个下降(反之亦然)。
0% 设置没有过冲,其行为类似于典型的 EQ 架。
大约 50% 的设置模仿了一些以其“音乐”品质而闻名的模拟均衡器的行为。
滚动、Command 拖拽(macOS) 或 Control 拖拽(Windows) 搁架频带的拉手以调整其 Q值。
Listen
Drag the Listen control to solothe region around the selected EQ bnad.
This can be helpful when exploring the contribution of certain parts of a sound to the rest of the mix,
and when exploring with the aid of the resonance metering.
Alt Dragging any EQ band's handle in the graph also activates Listen mode.
While Listen is active, drag vertically to adjust the Listen volume without changing the band's EQ gain.
聆听

拖拽 Listen(聆听)控制,在选定的 EQ 频带周围的区域进行独奏。
这在探索一个声音的某些部分对混音其他部分的贡献时,
以及在借助于共振测量进行探索时,是很有帮助的。
按住 Alt 键拖拽图表中的任何 EQ 频段拉手也会激活聆听模式。
当聆听处于活动状态时,垂直拖拽可在不改变频段均衡器增益的情况下调整聆听音量。
Precise control
Shift Drag any control to adjust it with greater precision.
Double Click any numeric label to enter a precise value with the keyboard.
精准控制
按住 Shift 拖拽任何控制以更精确地调整它。
双击任何数字标签以使用键盘输入精确值。
Piano note value display
钢琴音符值显示

This display shows the note value of the current band's centre Frequency.
Double Click the value to enter a note value to set the band to.
此区域显示当前频段中心频率的音符值。
双击数值,输入一个音符值来设置频带。
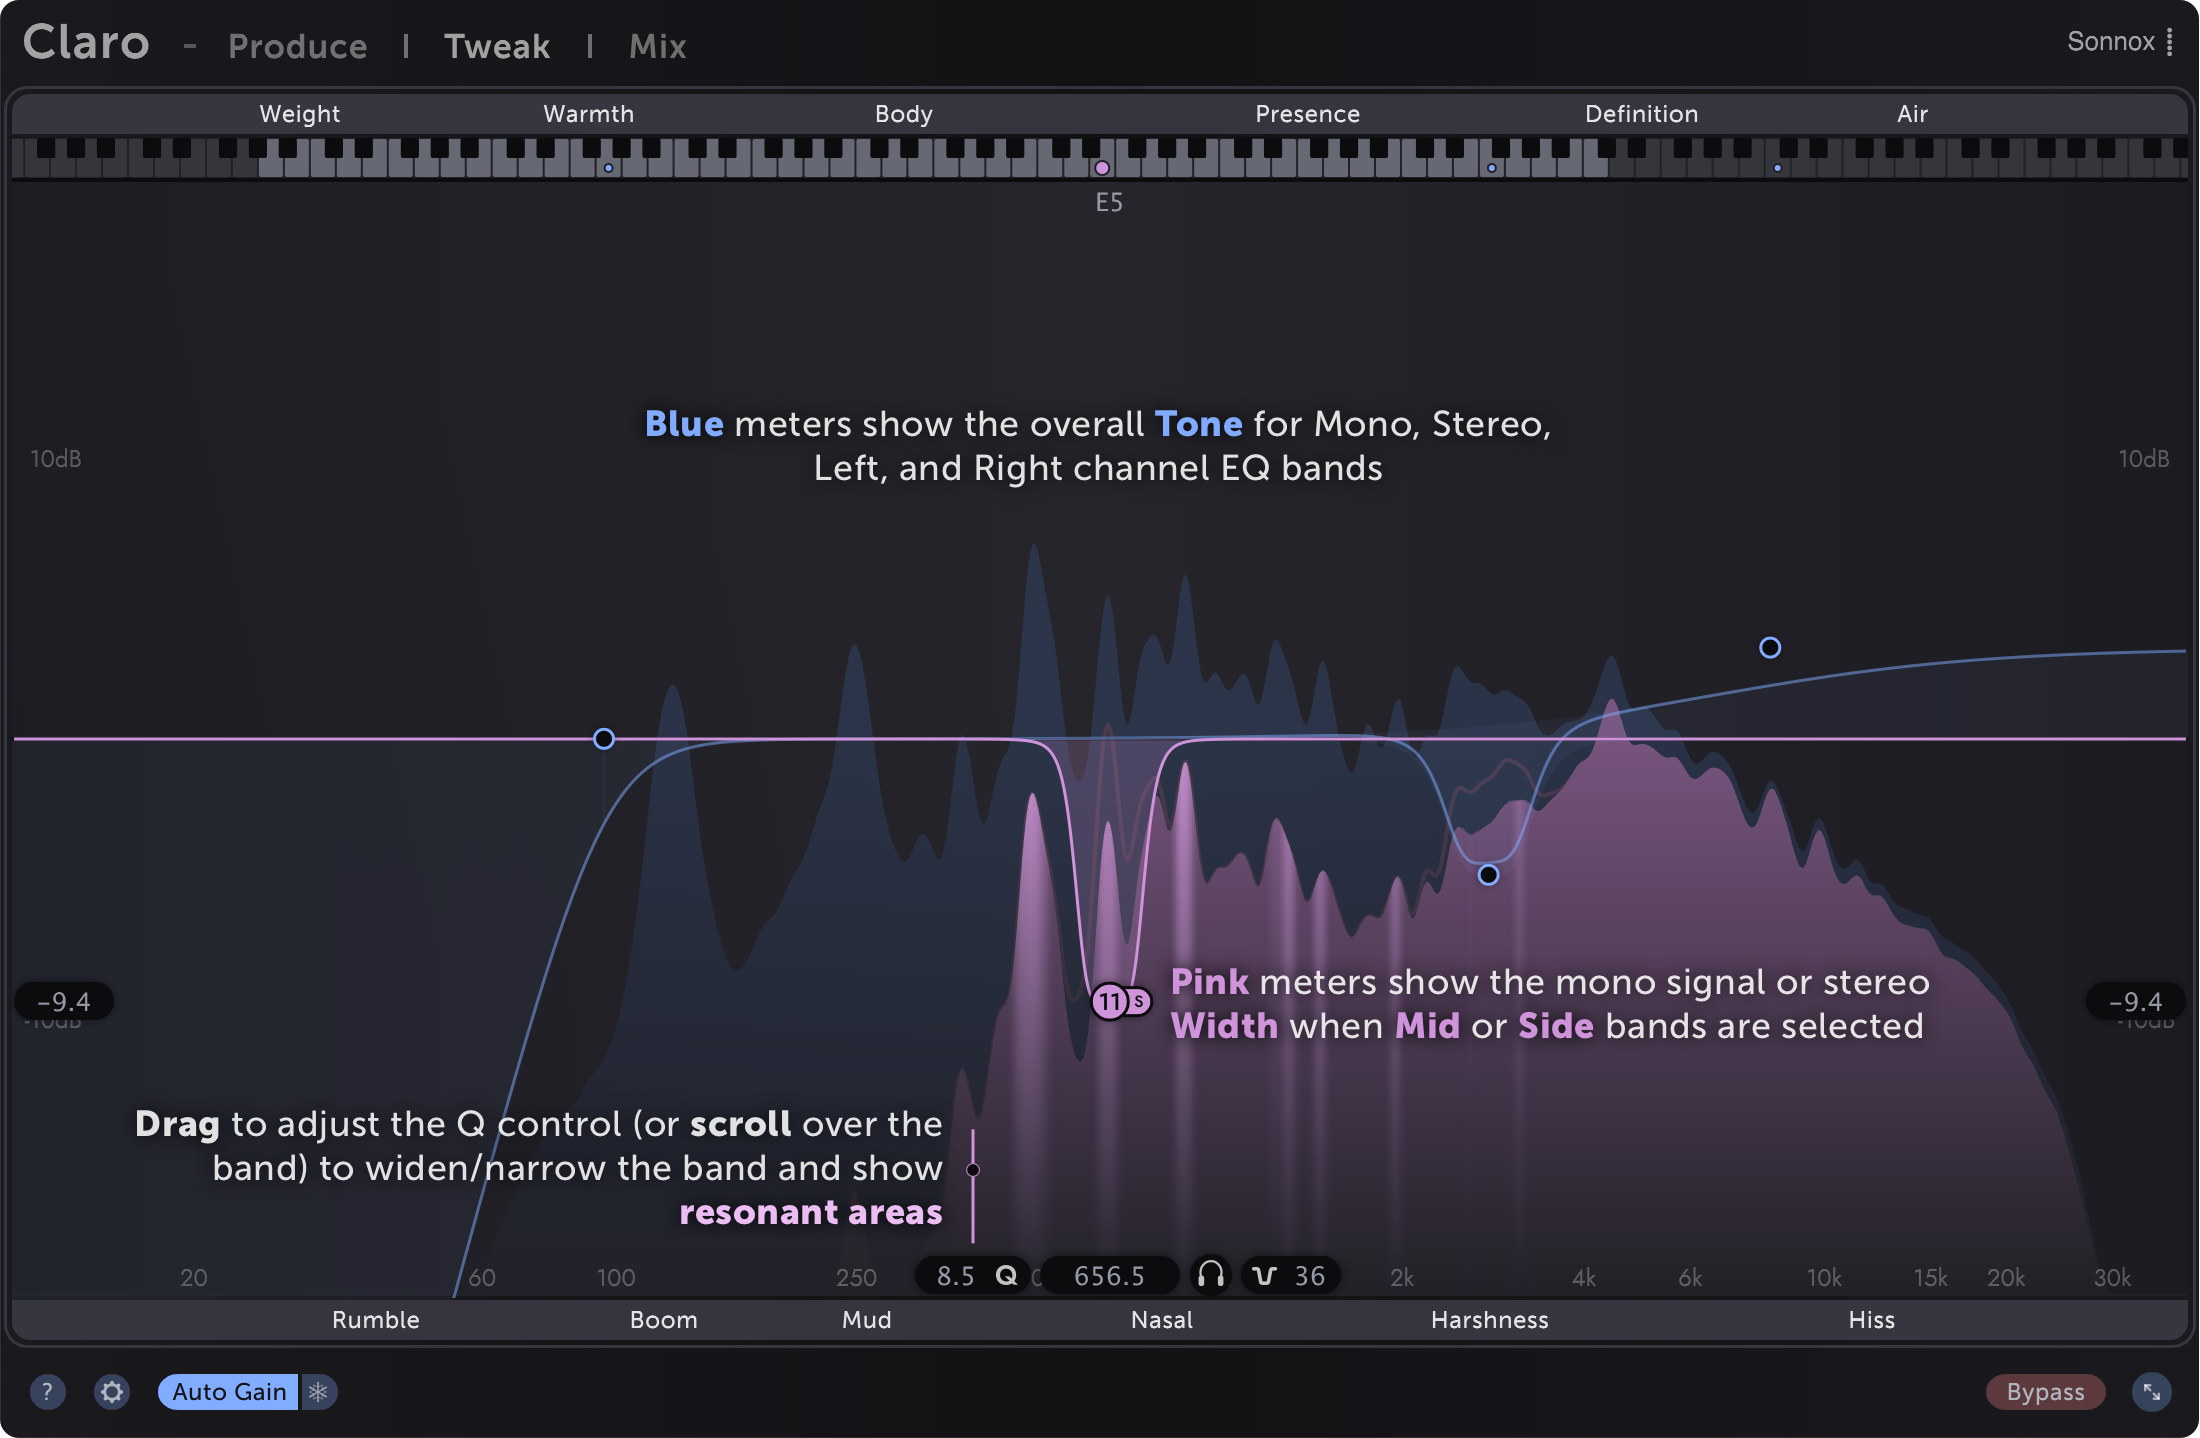
Adaptive spectral meteringClaro's spectral metering adapts to your EQ moves to always show the most useful information
- whether you're tweaking overall tonal balance or resonance-hunting,
on the stereo channel or on left, right, mid or side sub-channels.
自适应光谱计量
Claro的频谱测量适应你的均衡器动作,总是显示最有用的信息
--无论你是在调整整体的音调平衡还是在寻找共振,
在立体声通道还是在左、右、中或侧的子通道。
--无论你是在调整整体的音调平衡还是在寻找共振,
在立体声通道还是在左、右、中或侧的子通道。
ResonancesWhen adjusting overall tonal balance with a wide Bell or Shelf band, the meter becomes slow and smooth, showing the overall balance of the spectrum.
When searching for resonant areas to tweak, the meter shows precise peaks, and the peaks which resonate most over time are highlighted.
What does resonance mean?
These are the sharp, tonal characteristics of some signals which ring over time, like the overtones of a bell.
They're present in most sounds, and help determine that sound's character, including its pitch.
Sometimes, though, such areas can give the sound a boxy or harsh character that we would prefer to reduce.
It's common to find these unwanted resonances by boosting with a narrow Bell band and sweeping the Frequency up and down.
The idea is that the resonances we want to reduce will jump out the most, showing us where to place our EQ band.
In practice, though, this approach has downsides.
In short, all parts of a signal tend to sound quite bad when sweeping a narrow boost.
And when we decide where to place our EQ cut, we've just been listening to an exagerrated version of the "problem" area.
The result: it's still often difficult to find the areas we're looking for, and we can over-attenuate
because we've primed ourselves by boosting first.
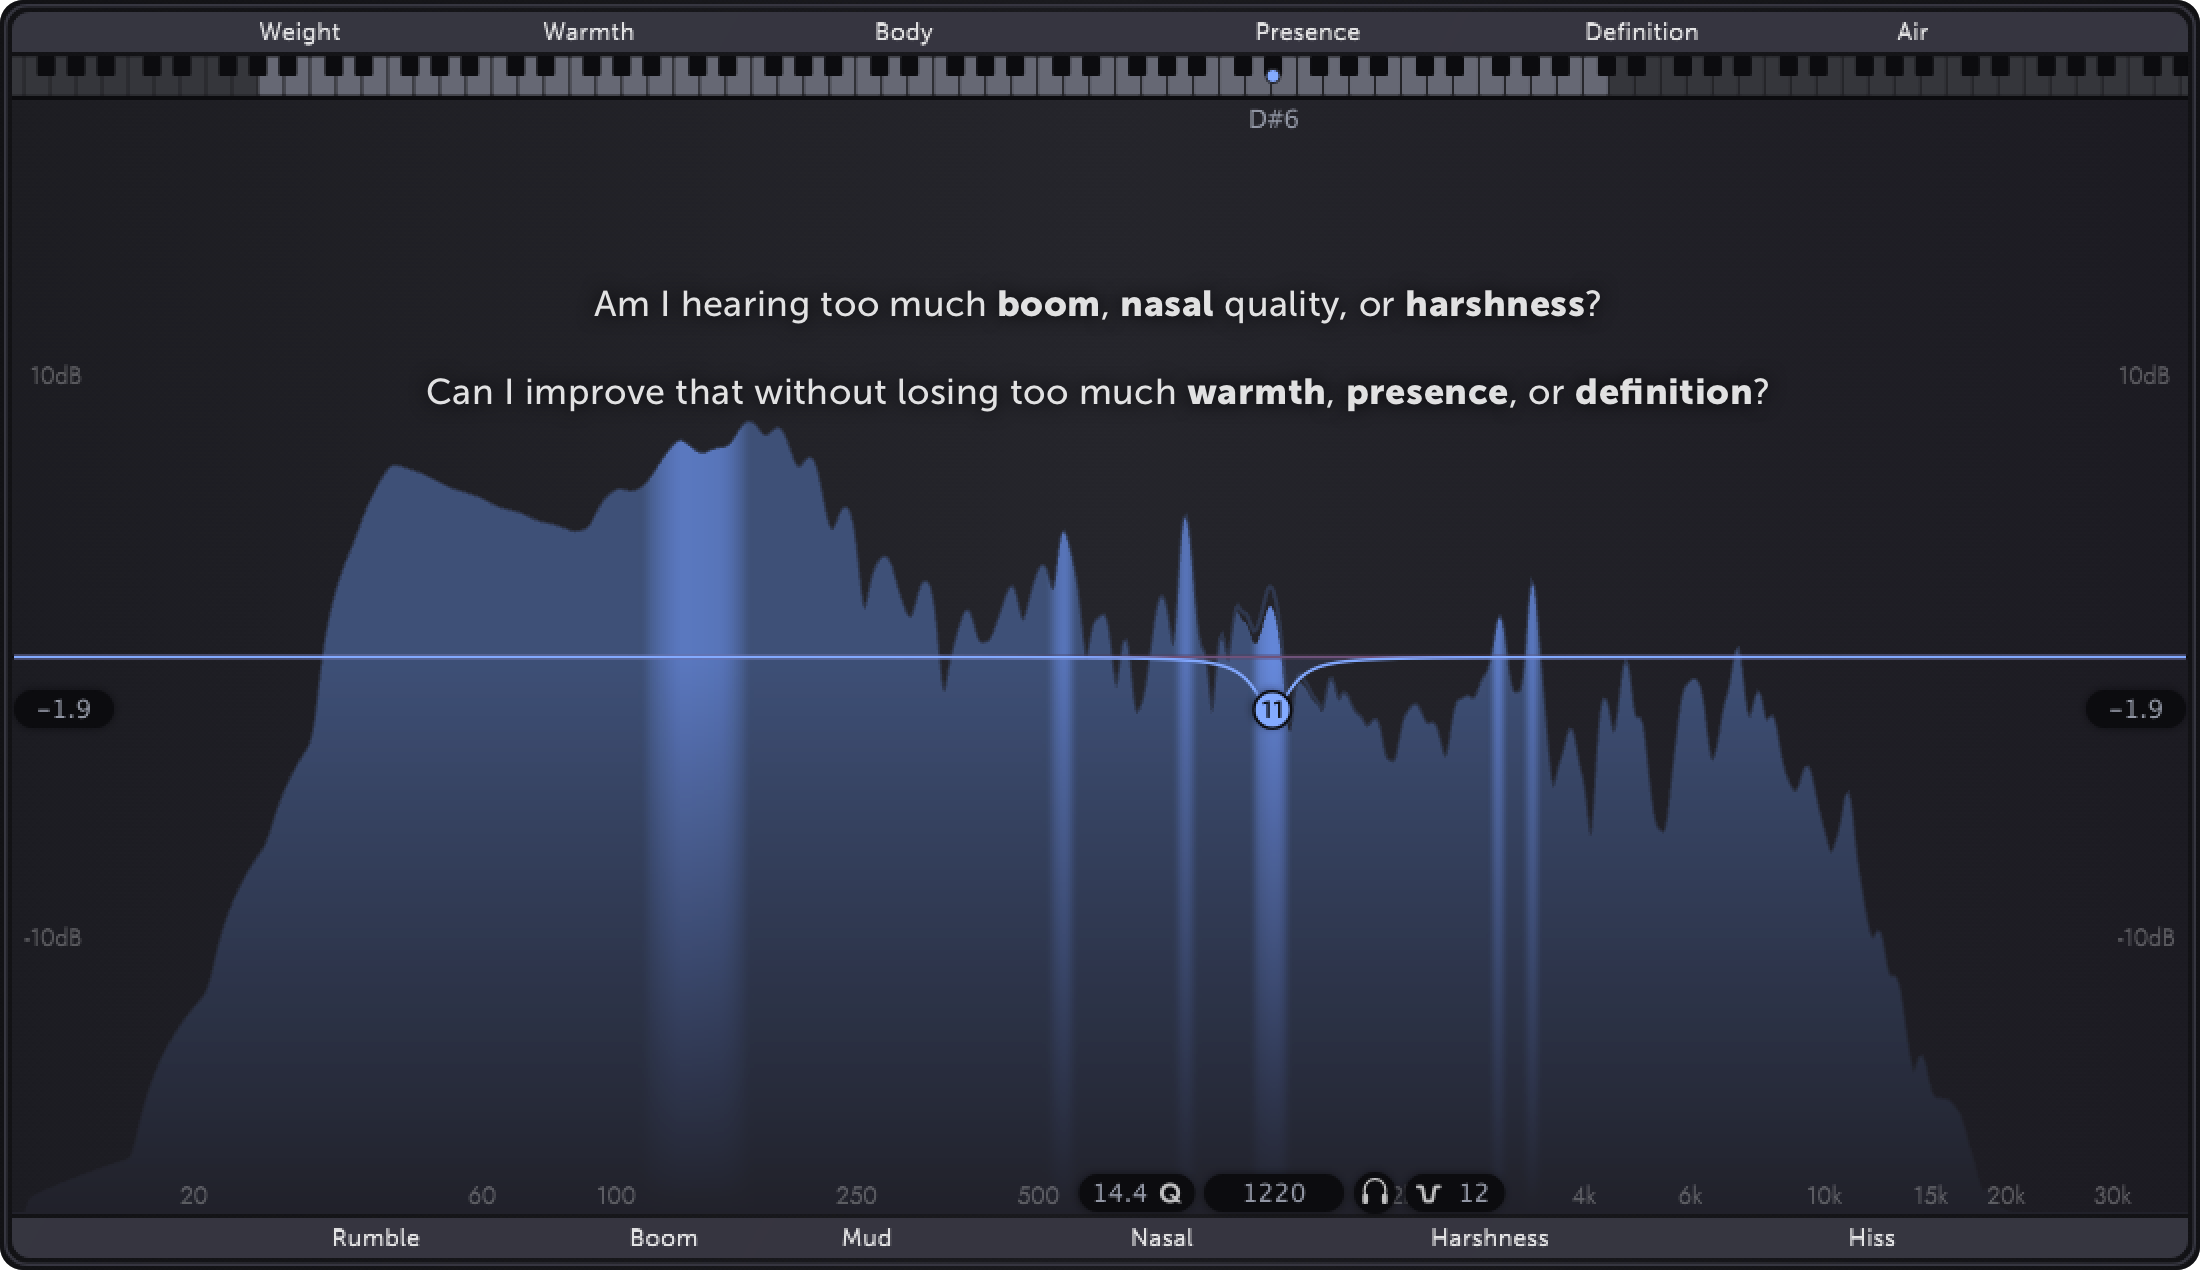
With Claro, there's no need to work around these downsides.
Simply grab a Bell band and scrollto narrow the Q. Then think, for example:
共振
当用宽的钟形或搁架频带调整整体音调平衡时,仪表变得缓慢而平滑,显示频谱的整体平衡。
在搜索要调整的共振区域时,仪表会显示精确的峰值,并且会突出显示随时间变化最大的峰值。
共振 是什么意思?
这些是一些随时间响起的信号的尖锐音调特征,例如钟声的泛音。
它们存在于大多数声音中,有助于确定声音的特征,包括其音高。
但有时,这样的区域会给声音带来硬直或刺耳的特性,我们更希望能减少这种特性。
通过用一个狭窄的钟形频带进行升压,并上下扫频,通常可以找到这些不需要的共振。
我们的想法是,我们想要减少会跳出来最多的共振,告诉我们应该把EQ频带放在哪里。
然而,在实践中,这种方法有缺点。
简而言之,当扫描一个狭窄的提升时,信号的所有部分往往听起来很糟糕。
当我们决定将 EQ 频带放在哪里时,我们只是在听“问题”区域的夸大版本。
结果:通常仍然很难找到我们正在寻找的区域,而且我们可能会过度衰减,
因为我们已经通过先增强来为自己做好准备。
使用 Claro,无需解决这些缺点。
只需抓住一个钟形频带并滚动鼠标以缩小 Q。然后思考,例如:
Defaulting to Tweak viewIf you tend to use Claro for later-stage mixing projects and always want to dive right into the details in Tweak view, simply toggle the option in Preferences.
默认为 Tweak 视窗
如果您倾向于将 Claro 用于后期混音项目,并且总是想在 Tweak 视窗中深入了解细节,只需在 Preferences 中切换选项即可。
MixClaro's Mix view contains all the information you need to understand and assemble your mix.
All Claro instances in your project are displayed in context for you
to prioritise, allocate space, explore interactions and quickly mitigate excessive overlaps.
A single Claro Mix view allows you to very quickly explore your entire mix and tweak any two Claro instances at the same time
without needing to find and juggle many plugin windows.
混合 视窗
Claro 的 Mix 视窗包含了解和组合混音所需的所有信息。
项目中的所有 Claro 实例都显示在上下文中,
以便您确定优先级、分配空间、探索交互并快速减少过度重叠。
单个 Claro Mix 视窗允许您非常快速地探索整个混音并同时调整任何两个 Claro 实例,
而无需查找和处理许多插件窗口。
项目中的所有 Claro 实例都显示在上下文中,
以便您确定优先级、分配空间、探索交互并快速减少过度重叠。
单个 Claro Mix 视窗允许您非常快速地探索整个混音并同时调整任何两个 Claro 实例,
而无需查找和处理许多插件窗口。
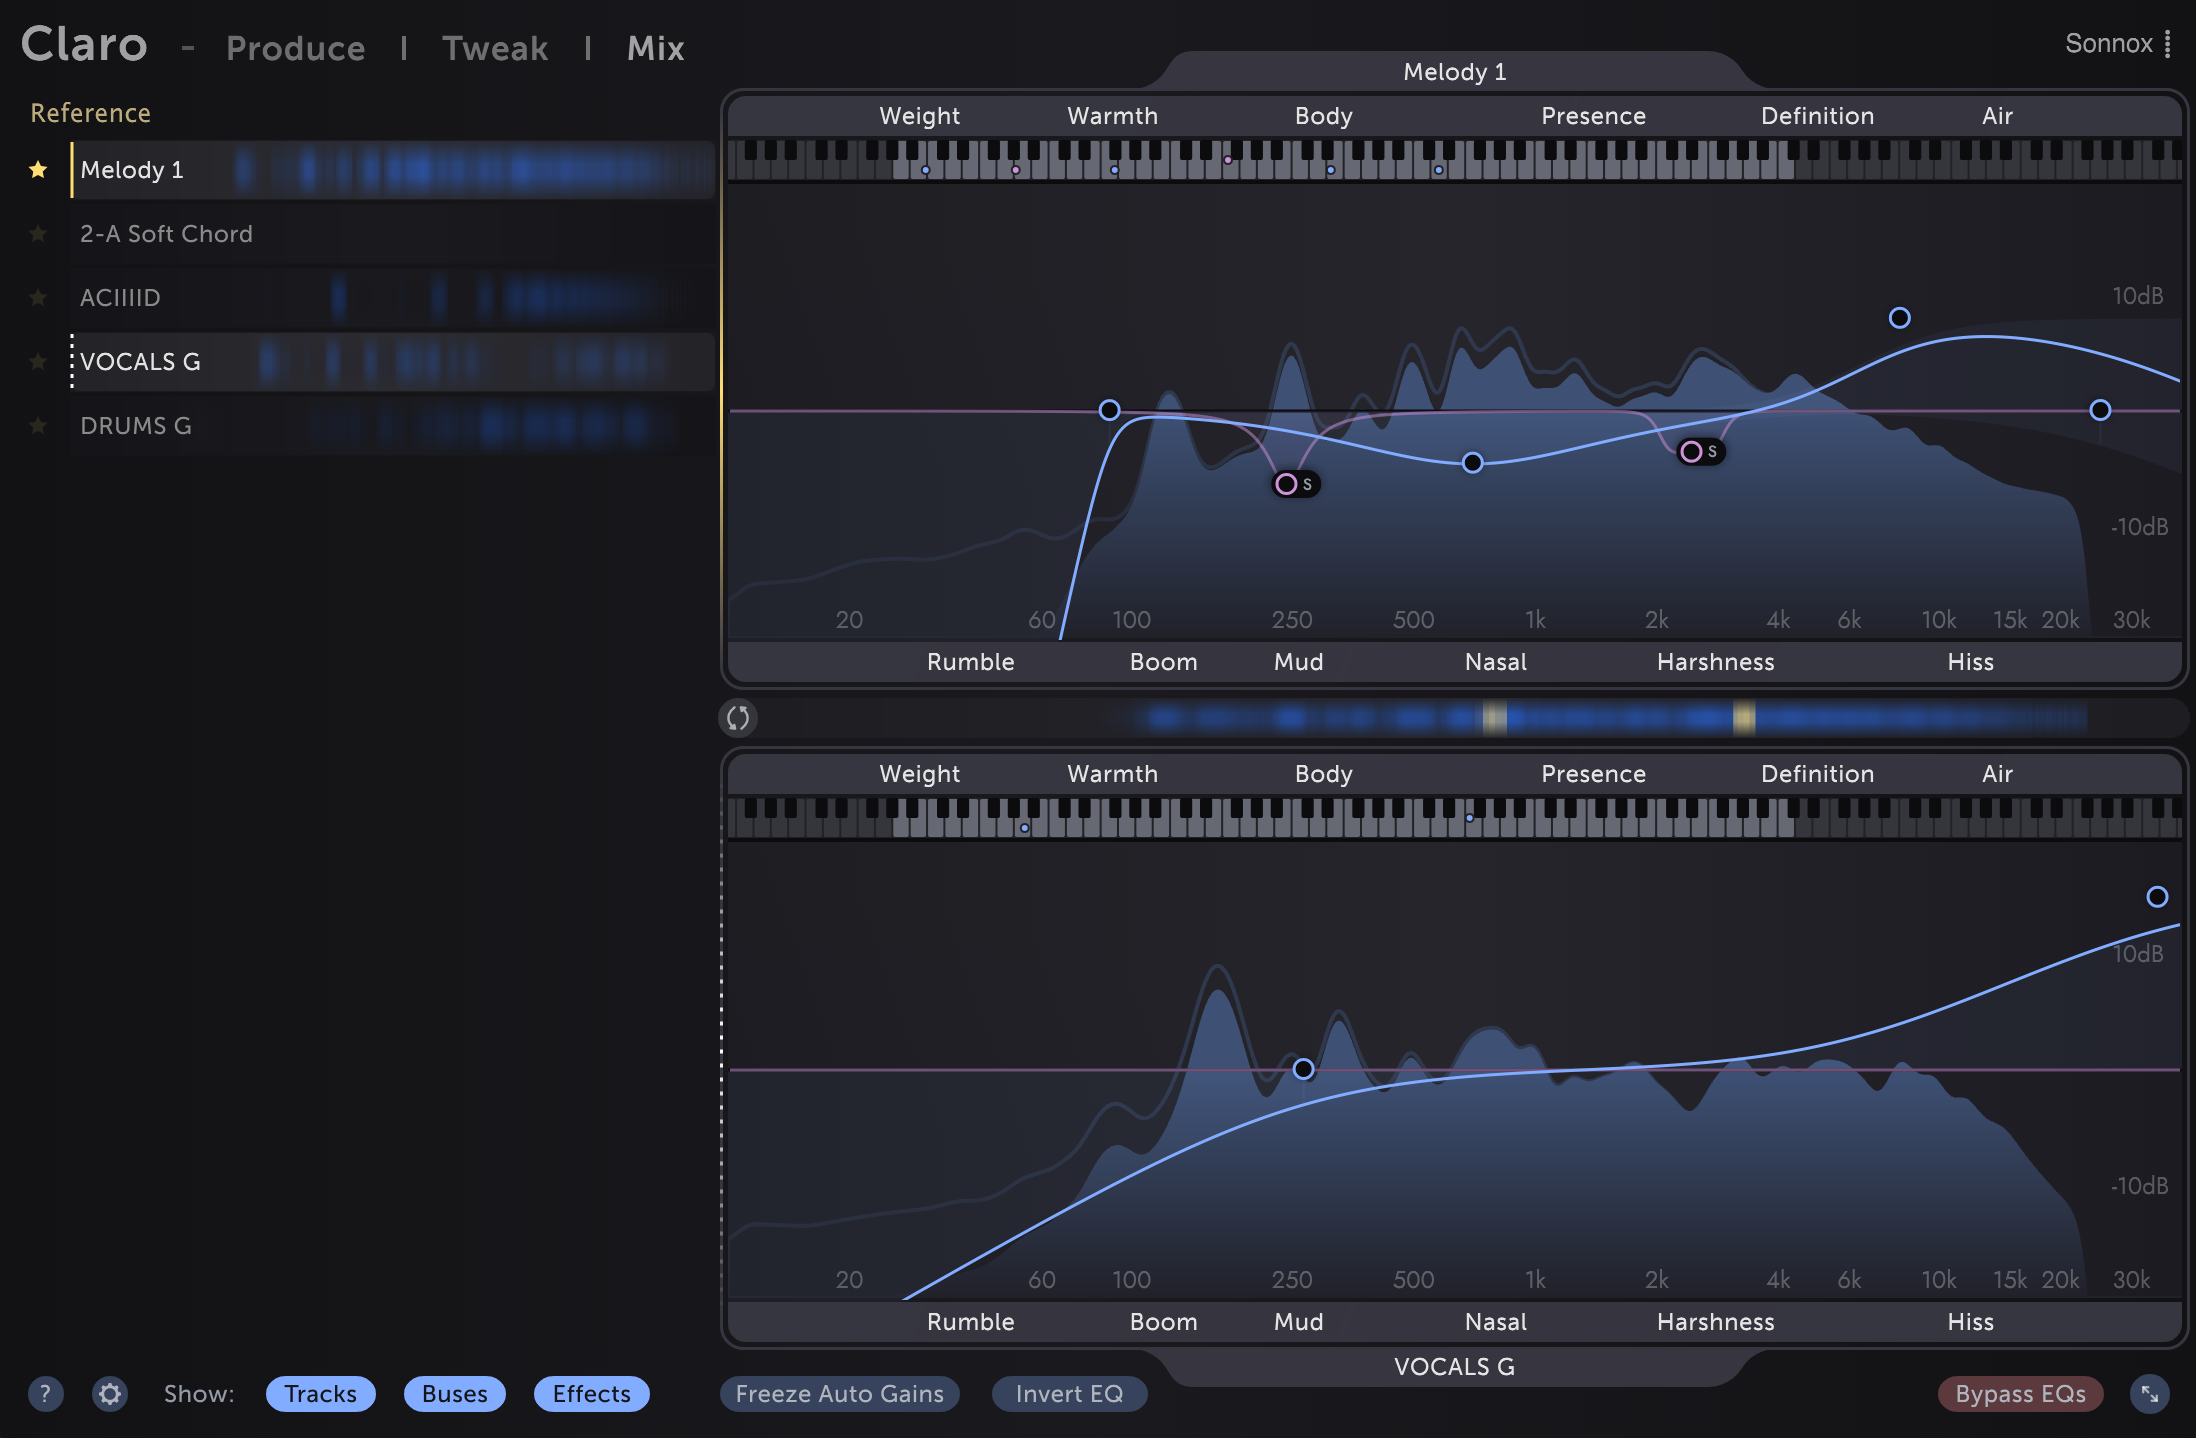
WorkflowThere are four key sections in Mix view:
Blue meter areas show the overall energy of that track, just like the Produce view metering.
Yellow meter areas show where that track overlaps with the energy of your Reference Track enough that their combination might sound muddy, harsh,
or otherwise make the Reference Track more difficult to hear.
Any track that shows large or numerous yellow overlap areas is a good candidate to load into the Working EQ slot, so that its tone can be tweaked alongside the Reference Track.
工作流程
Mix 视窗中有四个关键部分:
左边的轨道列表
参考音轨 EQ 槽(顶部)。要改变参考音轨,请点击音轨列表中的黄星或将音轨拖到顶部的 EQ 槽。
工作轨道 EQ 槽(底部)。要改变工作轨道,请点击列表中不同轨道主体的任何位置,或者将轨道拖到底部的 EQ 槽上。
页脚,包含 Mix 视窗的特定功能
左边的轨道列表显示所有使用Claro的轨道的光谱能量。
蓝色仪表区域显示该轨道的整体能量,就像 Produce 视窗的计量一样。
黄色仪表区域显示了该轨道与参考轨道的能量重叠的地方,以至于它们的组合可能听起来很浑浊,很刺耳,
或以其他方式使参考轨道更难听。
任何显示大量黄色重叠区域的轨道都是加载到工作均衡器插槽的理想选择,以便可以在参考轨道旁边调整其音调。
Overlap metering and maskingThe yellow overlap areas show where the Reference Track and Working Track are overlapping enough that the Reference is struggling to cut through the mix.
Sometimes these excessive overlaps are called "collisions" or, more precisely, "spectral masking".
Masking occurs when a frequency range of one signal is sufficiently louder than the same frequency range in a second signal
such that our ear-brain system doesn't notice that frequency range in the quieter signal.
This is why we can have the experience of a single track being easily audible when solo'd but difficult to hear clearly in the full mix.
In a sense, all mix elements compete for attention and one of our jobs while mixing is
to make sure that the right elements win at the right moments,
while keeping the overall tone of the full mix balanced.
A good way to approach this in Claro's Mix view is to
重叠测光和遮蔽
黄色重叠区域显示参考音轨和工作音轨重叠到参考音难以切入混音的位置。
有时,这些过度重叠被称为“碰撞”,或者更准确地说,称为“光谱掩蔽”。
当一个信号的频率范围比第二个信号的相同频率范围大得多,
以至于我们的耳脑系统不会注意到较安静信号中的频率范围时,就会发生掩蔽。
这就是为什么我们可以体验到单轨在独奏时很容易听到但在完整混音中很难听清的原因。
从某种意义上说,所有混音元素都在争夺注意力,
我们在混音时的一项工作是确保正确的元素在正确的时刻获胜,
同时保持完整混音的整体基调平衡。
在 Claro 的 Mix 视窗中解决这个问题的一个好方法是
决定哪个轨道应该在每个频率范围内领先。例如,您可能希望在 Body → Presence 范围内引导主旋律部分或人声
首先将该轨道设置为您的参考
检查显示黄色重叠的其他曲目的曲目列表
将一个加载到工作轨道 EQ 插槽中并调整两个 EQ 以供品味,然后加载另一个并重复
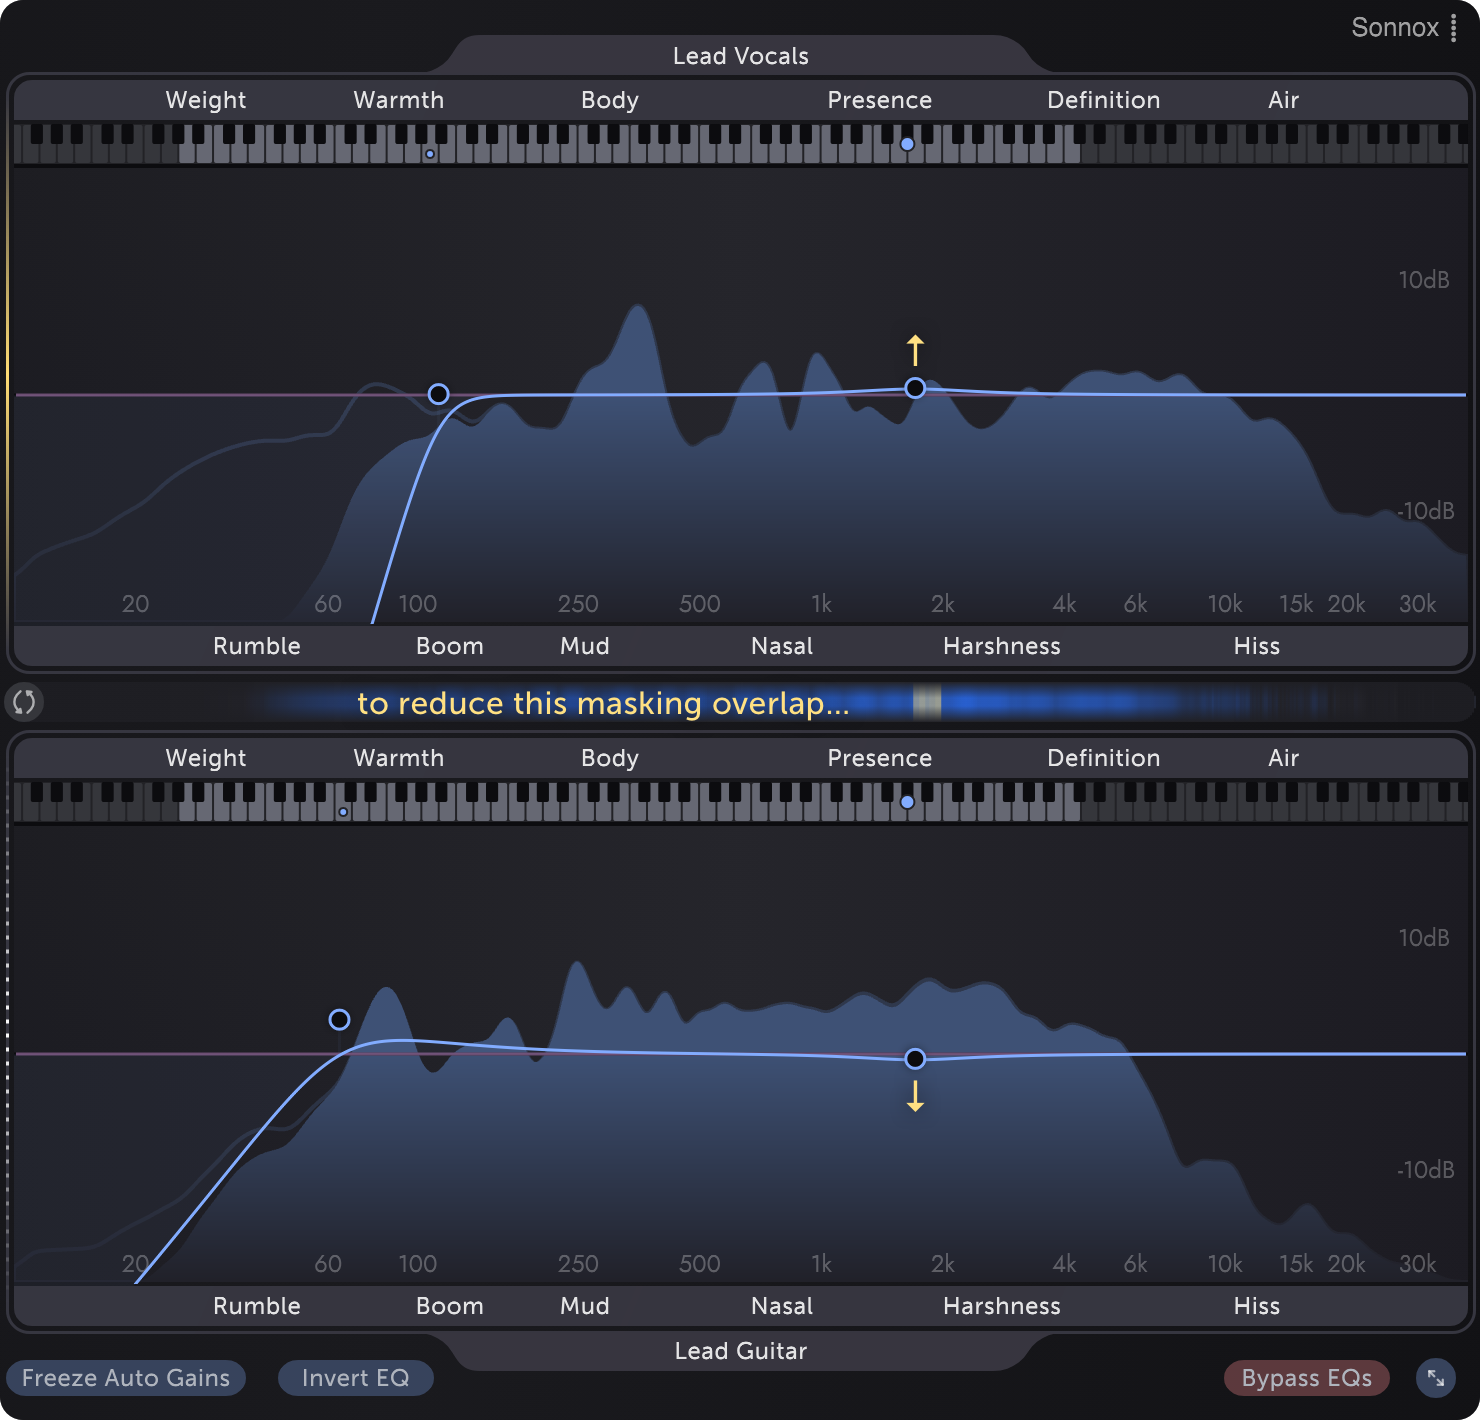
By tweaking overlapping tracks to create space for the lead melody to sit in we can avoid counter-productive moves
such as making that lead melody line easier to hear by turning it up or boosting its Presence, both of which might unbalance the mix.
Sometimes it's even more effective to do a little of both - enhance the lead's Presence while attenuating the same range on overlapping tracks.
See Invert EQ moves for a way to make this easier.
通过调整重叠的音轨为主旋律创造空间,我们可以避免适得其反的动作,
例如通过将主旋律调高或增强其临场感来使主旋律线更容易被听到,这两者都可能使混音不平衡。
有时两者兼而有之会更有效 - 增强领先的存在感,同时衰减重叠轨道上的相同范围。
有关简化此操作的方法,请参阅反转均衡器移动。
Masking is not always badAll mixes, including our favourites, contain lots of masking.
Instruments and voices overlapping helps the mix blend together with character that is greater than the sum of its parts.
掩饰并不总是坏事
所有的混音,包括我们最喜欢的,都包含大量的遮蔽。
乐器和人声的重叠有助于混音与大于其各部分总和的特征融合在一起。
更少的掩蔽使元素听起来更清晰。
这可能是可取的,例如,当我们希望旋律和歌词具有高度可理解性时,
或者当音乐的律动依赖于 Warmth → Body 范围内的底鼓和低音之间的相互作用时。
更多的掩蔽可以使元素听起来彼此不那么明显,就好像它们混合在一起一样。
这也可能是可取的,例如,如果我们希望旋律和歌词听起来嵌入在混音的深处,而不是漂浮在其上,以增强音乐的强度。
朝哪个方向调整取决于您。Claro 旨在使重叠和掩蔽可见,并使您能够探索它们是否有助于实现您想要的声音。
乐器和人声的重叠有助于混音与大于其各部分总和的特征融合在一起。
更少的掩蔽使元素听起来更清晰。
这可能是可取的,例如,当我们希望旋律和歌词具有高度可理解性时,
或者当音乐的律动依赖于 Warmth → Body 范围内的底鼓和低音之间的相互作用时。
更多的掩蔽可以使元素听起来彼此不那么明显,就好像它们混合在一起一样。
这也可能是可取的,例如,如果我们希望旋律和歌词听起来嵌入在混音的深处,而不是漂浮在其上,以增强音乐的强度。
朝哪个方向调整取决于您。Claro 旨在使重叠和掩蔽可见,并使您能够探索它们是否有助于实现您想要的声音。
Should Claro always be the last plugin on each track?Ideally yes, so that the overlap metering shows the actual signals that you are hearing, rather than those signals before other plug processing.
Claro 应该是每个轨道的最后一个插件吗?
理想情况下是这样,以便重叠计量显示您听到的实际信号,而不是在其他插头处理之前的那些信号。
But don't wory, you don't need to move Claro instances that you used early on - this could change the behaviour of the other processing on that track.
When you want to start tweaking overlaps between tracks, and if Claro isn't already the last insert on a track,
just add another instance at the end of the track's plugin chain.
That track will show in Claro's Mix view as a folder of multiple instances,
and the one you just added will automatically be used when setting that track as your Reference or Working EQ.
但是不要担心,您不需要移动您早期使用的 Claro - 这可能会改变该轨道上其他处理的行为。
当您想开始调整轨道之间的重叠时,如果 Claro 还不是轨道上的最后一个插入,
只需在轨道插件链的末尾添加另一个实例。
该轨道将在 Claro 的 Mix 视窗中显示为多个实例的文件夹,
并且在将该轨道设置为参考或工作均衡器时,将自动使用您刚刚添加的那个。
Can I still use my faders?Please do! Claro's Mix view metering is scaled by your DAW faders to match what you're hearing,
rather than matching the pre-fader track volume. And the overlap metering is always relative to the Reference Track.
So, if you need to turn everything down towards the end of a mix, you can do so with a gain plugin before all Claro instances,
or by pulling all of the DAW faders down by the same amount - without affecting the overlap metering.
See Compatibility for details about your DAW.
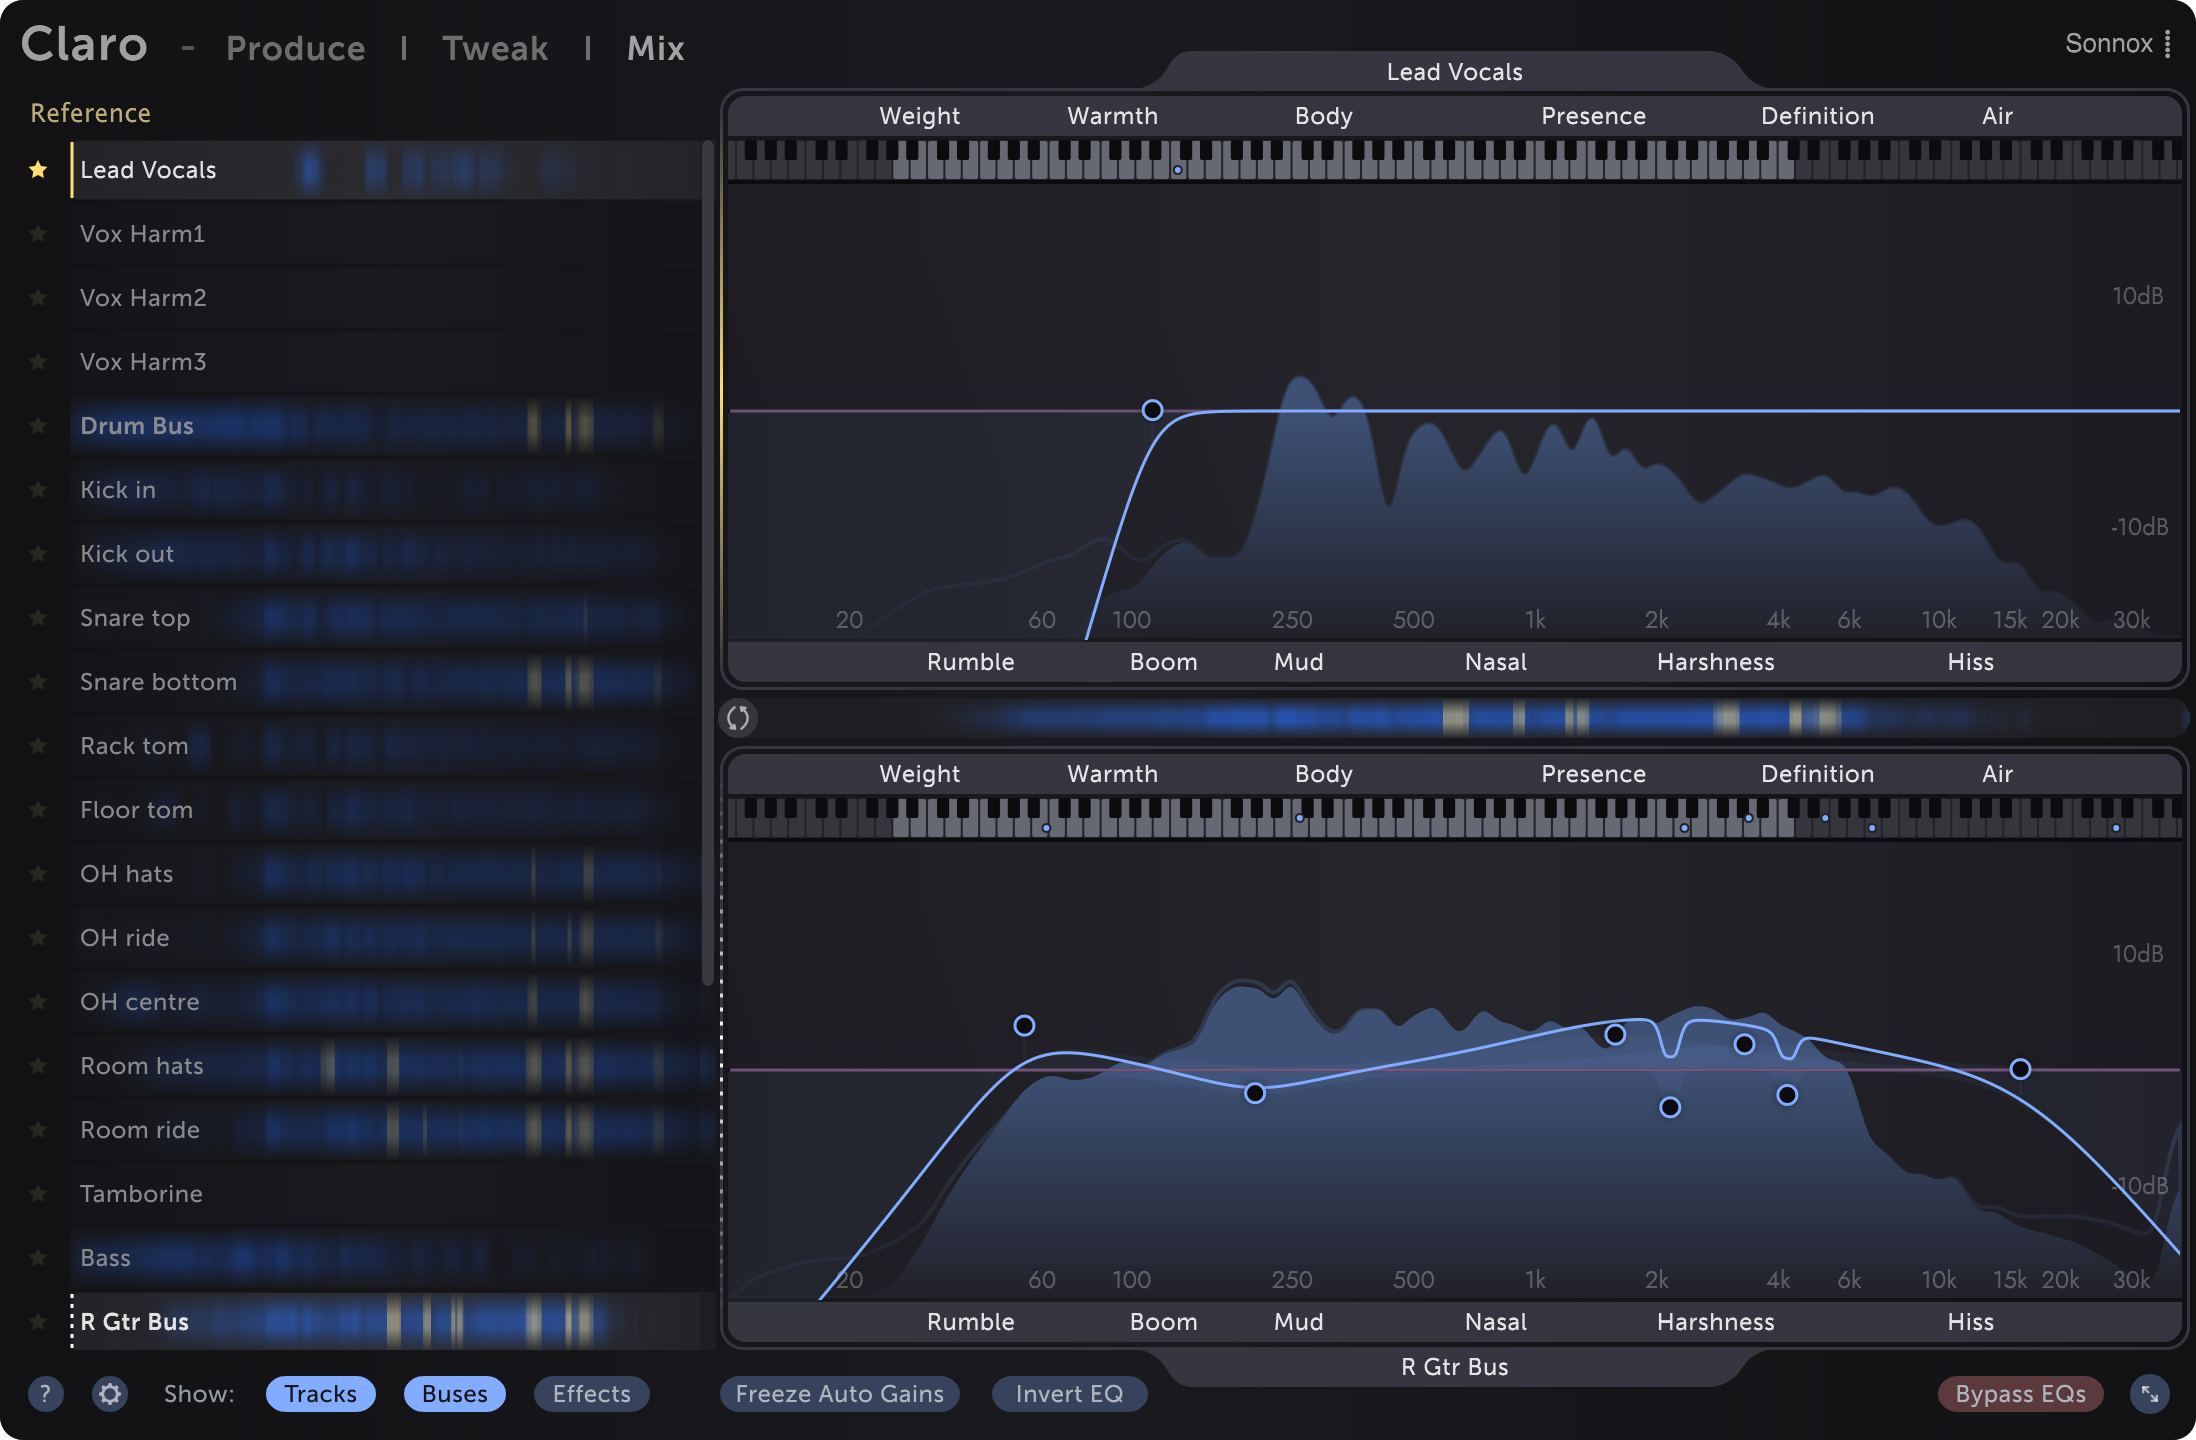
This also means that your DAW faders can be used to reduce the masking that you're seeing and hearing.
For example, the amount of masking between this lead vocal track and other mix elements suggests that the vocal is too quiet.
我还能使用我的推子吗?
请使用!Claro 的 Mix 视窗计量由您的 DAW 推子缩放以匹配您所听到的内容,
而不是匹配推子前的音轨音量。并且重叠测光总是相对于参考轨道。
因此,如果您需要在混音结束时将所有内容调低,您可以在所有 Claro 实例之前使用增益插件来实现,
或者将所有 DAW 推子拉下相同的量 - 而不会影响重叠计量。
有关DAW 的详细信息,请参阅兼容性。
这也意味着您的 DAW 推子可用于减少您看到和听到的掩蔽。
例如,此主音轨道和其他混音元素之间的掩蔽量表明人声太安静了。
而不是匹配推子前的音轨音量。并且重叠测光总是相对于参考轨道。
因此,如果您需要在混音结束时将所有内容调低,您可以在所有 Claro 实例之前使用增益插件来实现,
或者将所有 DAW 推子拉下相同的量 - 而不会影响重叠计量。
有关DAW 的详细信息,请参阅兼容性。
这也意味着您的 DAW 推子可用于减少您看到和听到的掩蔽。
例如,此主音轨道和其他混音元素之间的掩蔽量表明人声太安静了。
In this case, pushing the lead vocal track's fader up might be a more effective first move than boosting its Presence or attenuating the Presence of other tracks.
If this vocal was already sitting at the volume you want, but still wasn't intelligible enough, tweaking the balance of Presence across multiple tracks would help.
Tip: Excessive masking of lead elements suggests that an alternate musical arrangement may be even more effective than volume or tone tweaking.
在这种情况下,向上推主声轨的推子可能是比提高其临场感或减弱其他轨道的临场感更有效的第一步。
如果这个人声已经达到您想要的音量,但仍然不够清晰,那么调整多个轨道之间的存在平衡会有所帮助。
提示:对主音元素的过度遮蔽表明调整音乐编排可能比音量或音调调整更有效。
Invert EQ movesBoosting on one track and attenuating on the other can reduce excessive overlaps while changing the tone of each track less.
This is because less EQ gain is required on each track to create the same amount of difference betwen them.
To do this quickly in Claro, enable thebutton and EQ as normal.
反转 EQ 移动
在一个轨道上增强并在另一轨道上衰减可以减少过度重叠,同时减少每个轨道的音调。
这是因为在每个轨道上创建相同数量的差异所需的 EQ 增益较少。
要在 Claro 中快速完成此操作,请
 照常启用按钮和均衡器。
这是因为在每个轨道上创建相同数量的差异所需的 EQ 增益较少。
要在 Claro 中快速完成此操作,请
When enabled, all EQ adjustments are mirrored on the other instance with inverse gain.
启用后,所有 EQ 调整都以反向增益镜像到另一个实例上。
Tracks / Buses / Effects visibility
When working on a mix with many tracks, buses, and auxiliary effects returns the track list filtering buttons in the footer allow you to hide track types that you don't want to see yet.
For example, you might want to start with only Buses visible for a top-down mixing approach
- explore overlaps and subtle EQ tweaks across buses before stepping down to the level of tracks.
Or you might prefer the opposite bottom-up approach, starting with just the Tracks visible!
Or you might find that Reverb and Delay Effects returns seem to significantly overlap with all other tracks,
and therefore not want to see their metering all the time. Remember, masking is not always bad.
Claro categorises tracks by the track type in the DAW, or based on the name of the track where the track type is not available.
See Compatibility for details.
轨道/总线/效果可见性

在处理具有许多轨道、总线和辅助效果的混音时,会返回页脚中的轨道列表过滤按钮,允许您隐藏不想看到的轨道类型。
例如,您可能希望从自上而下的混音方法中仅从总线可见
- 在逐步降低到轨道级别之前,探索总线之间的重叠和微妙的 EQ 调整。
或者您可能更喜欢相反的自下而上的方法,从可见的轨道开始!
或者您可能会发现混响和延迟效果返回似乎与所有其他轨道明显重叠,
因此不想一直看到它们的计量。请记住,掩蔽并不总是坏事。
Claro 根据 DAW 中的轨道类型或基于轨道类型不可用的轨道名称对轨道进行分类。
有关详细信息,请参阅兼容性。
Bypass EQstemporarily bypasses both of the loaded tracks' Claro instances.
The button is non-latching to prevent instances from being left bypassed by accident when different tracks are loaded into the Reference and Working slots.
旁路均衡器

该按钮是非锁定的,以防止在将不同轨道加载到参考和工作插槽时意外绕过实例。
最后编辑:


